I have started to do some research into trailers, mostly by looking at the EZ Loader and King Trailers websites. This morning my wife and I drove down to Boat Country, the local King Trailer dealer. After talking with the salesman and showing him a copy of sheet 61 that shows the trailer details, he suggested that the KB2800 model would work fine. He explained that the choice of trailer here is governed by the boat length, not weight, since my boat will be relatively light. This trailer only has two bunks, but sheet 61 seems to show four...? Or is it two for the main hull, and two small bunks to help support the (folded) floats?
Anyway, there were several KB2800's on the lot and I looked one over really well, as I have never towed anything in my life and the mechanical details of a trailer are new to me. It looked like a really nice trailer. The saleman quoted me a price of $2147 plus tax. Well, I wasn't about to buy one today, and I need to take a look at an EZ Loader trailer in order to compare, but at least I now have a # to start planning the budget with... Anyway if anyone knows of a better or cheaper direction to go on this, please feel free to offer advice (other than "build your own trailer").
Boat Country is also a Honda outboard dealer, which got me looking at the Honda 5hp model they had in the showroom. I had previously been considering a Tohatsu 6hp, but the Honda looked like a fine little motor. I think 5hp would be more than enough for an F22? Anyone disagree?
Sunday, May 31, 2009
Preparing for beam mount installation
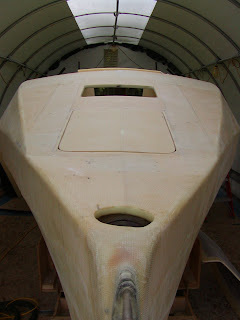
I had laminated a flange for the foredeck hatch and finally got around to installing it this weekend:
 In retrospect, it looks somewhat chunky...maybe that should be the name of my boat ("Chunky"). The hatch mounting surface is nice and level though, and rain should run around the flange rather than directly against the hatch. Here it is with the hatch in place:
 I will round over the outside edges and pretty it up a bit, but it looks good to me.
You can also see in the picture above that the anchor well is now taped in place. That job was more work than I expected, well at least the inside taping of the well compartment was no fun.
I cut the hole for the aft-cabin hatch as well:
 In looking at the plans again, I think my aft-cabin hatch is larger than specified. Well too late to go back now... I have to add another flange to make up a 3/4" mounting thickness (per the hatch install instructions) so I think this will help strengthen the hatch opening.
As usual there are quite a few odds and ends I could work on, but there is nothing major left that must be done before I install the beam mounts. So I started studying the plans today to get ready for this important step. It takes awhile to get your head wrapped around the geometry of what is going to happen; well at least it does for me. Can't afford mistakes on this particular step!
Here I'm making up the mold plates:
 Being able to actually hold the mold plates against the mounts is helping to clear up a lot of questions I had....makes more sense now.
I re-borrowed my neighbor's laser level and re-checked the level on the boat at the gunwale points. Not too bad, only fell out of level less than 1/2" and it was easy to fix. Next came marking the cut lines on the boat. I went low-tech with this and just made up cardboard templates:

Then I used a small level to figure out where the corners of the template fell on the hull, then connected the dots. The outlines I ended up look pretty good. And yes, I realize the template is backwards - I screwed that up on both fwd beam mount points before realizing my mistake (but didn't take a picture after fixing the orientation...).
I am looking fwd to getting the beam mounts done; once there, I can finally demolish my strongback (the only reason I'm still using it is because it is a fairly level surface) and set the boat directly on the ground. Which should make it easier to get in and out of.
Tuesday, May 26, 2009
Laminated anchor well supports
This is a short post. Had a few hours after work and got to work sanding down the fairing compound in the bow. It is actually starting to look pretty good, I am getting excited. However the very bottom of the bow bulkhead is terrible to sand - I can only get about two fingers in there. I may visit an auto body shop tomorrow, maybe they have some cool sanding attachments I can put on a drill.
I squared up the anchor well hatch and it is looking pretty nice IMO:
 I also sanded down the hatch supports I installed over the weekend, and the hatch is sitting nice and flush with the hull now. I figured this was a good time to add the extra reinforcement:
 Obviously I'll trim off the excess.
I am still researching what kind of a latch I should use for the anchor well hatch. I don't want it just flapping in the breeze....a simple tension latch should suffice, but the marine ones are a bit pricey.
I squared up the anchor well hatch and it is looking pretty nice IMO:
 I also sanded down the hatch supports I installed over the weekend, and the hatch is sitting nice and flush with the hull now. I figured this was a good time to add the extra reinforcement:
 Obviously I'll trim off the excess.
 I am still researching what kind of a latch I should use for the anchor well hatch. I don't want it just flapping in the breeze....a simple tension latch should suffice, but the marine ones are a bit pricey.
Monday, May 25, 2009
More hatch work
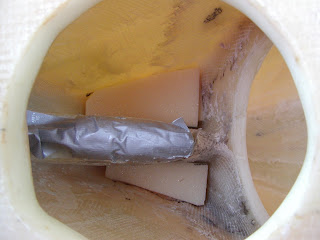
I started sanding this morning in the bow area, but then realized that I'd better get the anchor well hatch supports installed so I wouldn't drip stuff onto a faired surface. (Or maybe I was just looking for an excuse not to sand?) I scooped out the edge foam from the areas-to-be-exposed on the supports, filled them with bog, let them cure in the sun, then installed them:

From underneath:

They look a bit chunky from underneath - I think I made them a bit too long. Well no-one well ever see them unless they stick their head into the anchor well....
Later I did a test fit of the hatch-to-be:
 Not too bad, but I think my supports stick out a bit too far, thus holding the hatch a bit too high. It will get worse when I put some glass on the upper portion of the supports too - I may sand them down a bit. The hatch doesn't look like it is sitting square in the hole either - will need to trim things up for appearance's sake.
I'm mildly concerned about the weight-bearing capability of these supports. I don't know how to do the math, but I doubt there's any way they will hold a grown man stepping or jumping on the hatch. On the other hand, I don't feel like investing the effort to make them that strong. So I won't put no-skid on the anchor well hatch, and will just have to be careful. Nevertheless, I taped each support with two layers of A, just to be on the safe side. This took some time as I had to build up a fillet to transition from the support to the cabin roof - should have created the fillet from foam; that would have been easier (and lighter).
Here is my bunktop hatch flange:
 Getting installed:
 I haven't taped underneath yet. Looking at this picture, in retrospect I probably made the flange too wide, thus taking too much away from the open area. Oh well.
While waiting for the stuff above to cure, I decided to cut out the poptop hatch opening. I don't know that I'm at the right point in the process for this step, but I was getting pretty darn tired of contorting myself to get into the boat from that end. Now I have a nice big hole:
 It is much much easier to get into the cabin now. I noticed also that heat escapes from the cabin more easily, a nice bonus.
I kept going and installed the hatch coamings:
 The forward coaming required some work with the heat gun to get it to bend to the shape of the cabin roof. The side pieces were fine as-is. Unfortunately, I screwed up slightly when I cut out the hatch hole: I used the coaming-to-coaming dimension as my cut width, instead of adding the width of the coamings. So my hatch width is .75" times 2 equals 1.5" too narrow. I didn't realize it until later after the coamings were installed. Well it's not fatal but now I get to mentally adjust all of the other dimensions with respect to the poptop.
Before you ask where is the high-density inserts in the side coamings, well I made all three coamings from high-density. More weight true, but I still have some to spare might as well use it in a good spot.
I had a great holiday weekend, and felt like I made substantial progress on the boat (and found time to mow the lawn too). With the supports installed, I need to keep working on sanding in the bow area until I feel ready to tape in the anchor well. From there I should be moving fairly quickly to beam mount installation.
Sunday, May 24, 2009
Hatch work
Was able to spend several hours on the boat this evening. Am still mostly focusing on the bow area. Did the cutout for the foredeck hatch:
 I find that the hole in the bow is a convienent spot for propping up the vacuum tube for easy access.
 I find that the hole in the bow is a convienent spot for propping up the vacuum tube for easy access.
 These are my two Lewmar low profile hatches, one for the foredeck and the other (larger) one for the aft cabin:
 I laminated the anchor well cutout in preparation for pressing it into duty as a hatch. This is the first time I've used "poor man's vacuum bagging". Wow - maybe I got lucky, but the results were spectacular. Great laminate quality and not a single bubble!
 It would have worked even better if my plastic didn't have a bunch of folds and creases in it, but I was still quite impressed. As others have said I don't think it will work well on surfaces with compound curves, but otherwise it's a neat trick.
I spent a lot of time digging out the edges of the anchor well and foredeck hatch holes, so I could fill them with bog. The foredeck hatch hole edges have already been filled, here I'm working on the anchor well hole; digging these edges out always takes a lot longer than I think it should:
 This is a stack of four anchor well hatch supports (I'm doing mine like Menno), made from the scraps from the anchor well blank, clamped together so I can shape them in one go:
 These will be for the side supports; there's not much room for the top and bottom supports and I will wait to do those. I plan to get these supports glued on and laminated before I laminate the anchor well into place, so I can easily test-fit the hatch fit.
Finally, I have a laminated flange curing right now for the foredeck hatch and will hopefully get that on the boat tomorrow. I started some sanding of the fairing compound in the bow area but didn't get far due to limited time.
Saturday, May 23, 2009
Starting to fair the bow interior
I cut out and edge-filled the 6" inspection hatch for the fwd bow compartment. Due to the water-tightness requirement (presumably in case of collision), I'm going to use a low-profile inspection hatch. Also spent time sanding and cleaning up the bow cavity work from yesterday.
I dug out my fairing compound supplies and did some work on pre-fairing the anchor well; here it is getting a suntan to help it cure:
I dug out my fairing compound supplies and did some work on pre-fairing the anchor well; here it is getting a suntan to help it cure:
 I had a visit from Andrew this afternoon. He wanted to take a quick look at the main hull and see how things were going. It was fun talking with a fellow F22 builder.
After that I decided to start fairing the interior bow area. I'm dreading this job, so I figure I might as well get it over with. Took longer than I expected to just get the fairing compound applied, and it was nearly impossible to get it smooth in the very front area, eg under the bow bulkhead. Had to resort to using a gloved finger to spread the stuff around and hope for the best.
This is how I left it for the night:
I haven't yet installed my flange for the large bunktop hatch - that space is excellent for kneeling in while you work on the fwd area, so I decided to wait a bit.
I'm still thinking about the paint I'm going to use for the interior. Probably going to just use Alexseal again, but I think I will roll-and-tip this time; I can only imagine the blinding spray cloud that would develop if I tried to spray inside the boat.
Tomorrow I will be spending most of the day with family, but by Monday for sure I will be wearing a respirator and sanding on the interior. I'm not sure when I'll be ready to install the anchor well, depends on how the sanding goes. Also planning on cutting out the fore-deck hatch for better access after the anchor well is installed, and cutting out the poptop area - right now it's pretty awkward getting into the boat from the cockpit.
Friday, May 22, 2009
Bow cavity filled
I spent a couple of hours after work this week doing tedious hand-sanding of the tape edges inside the bow cavity, and finally deemed it good enough to move to the next step, filling the cavity with foam. This job is not that hard but it does take awhile to get the area filled up reasonably solid with foam, mainly again because of the small area:
No the foam fit is not perfect, but thanks to the magic of bog there's no need to worry. You can tell from the picture above that my bow web somehow ended up slightly offset to port - my hull halves didn't fit so well near this area, and I had to do a lot of "coaxing". It's not that noticeable especially from the outside so I'm just not going to worry about it.

No the foam fit is not perfect, but thanks to the magic of bog there's no need to worry. You can tell from the picture above that my bow web somehow ended up slightly offset to port - my hull halves didn't fit so well near this area, and I had to do a lot of "coaxing". It's not that noticeable especially from the outside so I'm just not going to worry about it.
Here's the foam chunks numbered and ready to go (I didn't want to lose track of the right order, in the heat of battle); the non-numbered piece in the foreground is the top "plate":
 All done, foam bogged in and a top layer of tape in place:
 Looking at the plans afterwards I think I filled the cavities slightly higher than I should have, but there's still a reasonable angle for good drainage and plenty of room to drill the drain holes.
I've also been working on an under-flange for the large fwd bunktop hatch. The edges of the hatch hole deflect more than I would like when I am climbing around in there, so I decided to beef it up a little, and also provide a lip for the hatch to sit on:
 I ran a small roundover bit around the exposed edge of the flange and have finished laminating glass around that edge. Tomorrow I'll glue it into place, then tape it in from the bottom. Not sure if I'll tape it in from the top as well, the extra glass might interfere with the hatch fit (but I could trim the hatch of course).
Tuesday, May 19, 2009
Bow bulkhead taped
Taped both fwd and aft sides of the bow bulkhead, including along the bow web of course. Here's the fwd side, pre-taping:
 I really like how the above picture shows that I am incapable of cutting a circular hole....but at least the foam core edges have been filled with bog! :)
 I really like how the above picture shows that I am incapable of cutting a circular hole....but at least the foam core edges have been filled with bog! :)
Taping the above area sucked for me, just like it has sucked for everyone else. Here's how it looked after taping...on second thought, I don't want to show this picture. You show me yours, and I'll show you mine....
Thankfully I did the tough part first, then moved to the inside:
 The taping job above should turn out nice.
Before I quit for the night, I laminated a couple layers of A onto the cutout from the bow bulkhead hole (to form a flanged hatch), and also put a single layer of A on the large fwd bunktop hatch cutout.
Sunday, May 17, 2009
Getting back into the swing
It's no secret that I took several months off from boat building. Which sucks, but work has always been a priority for me (especially in tough economic times like this) and I didn't feel like I had much of a choice in the matter. I got a little bit done last weekend, but this weekend was the first one in a long time where I was able to spend lots of time on the boat. We had a very nice weekend, so the boat was like a sauna inside the tent, but I enjoyed being outside and getting stuff done.
The transom is all buttoned up except for a little bit of foam to dig out near the rudder mount:
The transom is all buttoned up except for a little bit of foam to dig out near the rudder mount:
 It turned out pretty good IMO, with a double-thickness of foam all the way around. I wrapped the trailing edges with glass instead of filling them with bog. The transom edges feel solid as a rock. I also worked on a boat levelling dry run (covered in a previous post).
I spent a lot of time on the anchor well, the blank for which has been sitting in my downstairs since last year. I printed out the fwd template that was missing from the plans, traced the templates on, and cut it out a little bigger than the templates (wanted to leave some room for error). After a couple of hours of sitting in the boat trimming it back with the sander (and sweating like a pig), I finally got a pretty good fit:
 In some spots I trimmed a bit too far but overall the fit is good and the gaps should be easy to fix later when I tape it in:
 Twisting and turning inside the bow area made it very, very clear to me that this area of the boat needs to be finished up as much as possible. It will be difficult to reach anything once the anchor well is installed. So most of the day was spent on odds and ends toward the goal of getting the fwd interior done. I scraped out the bow web deck hole edges and filled them with bog; also did that for the larger fwd bunktop hatch. Thankfully I had saved the two bunktop hatch cutouts (must have been from 2+ years ago); first I scraped out and filled their edges with bog, and glued them together. I am looking into the best way to attach this as a "hatch"...maybe just a flange to hold it in place with a smooth finger hole to lift it out?
Here I am scraping out the large fwd bunktop hatch edges with a chisel:
 I've been looking at Menno's site to see how he did his anchor well hatch and it looks pretty good; I may copy his technique.
Last thing I did for the day was tack the bow web bulkhead into place. I don't normally tack pieces, preferring to tape them in one step, but the bow is a miserable area to work in. I'm not looking forward to taping the inner area around the web itself.
In a recent builder's update, Ian mentioned that he'll be selling F22 rudders soon. I had previously started to make one from foam, but it wasn't going very well. I may bite the bullet and buy one from Ian just to jump-start my progress and help me make the most of this building season. Sorry guys, I know that will make me a "cheater". :)
Floats are patiently waiting...
For me to finish the darn boat that is! I'm thinking about moving the floats from their current spot so I can mow underneath them and spray some vegetation killer. Poor things have weeds growing up between them:
 Otherwise they don't look any worse for wear other than being a bit dirty.
 Otherwise they don't look any worse for wear other than being a bit dirty.
Dry run on boat levelling
I have had a nagging worry all along that my boat would be out-of-square to the point where I would not be able to install the beam mounts properly. Although I am not ready for these just yet, I decided to do a test run and see just how bad (or good) things really were.
The most accurate gunwale markings I have left are on the beam bulkheads, so I cut out enough of a hole so that I could screw or clamp a small piece of straight wood to each bulkhead. The wood is fixed so that it is even with the gunwale marking. Then I hung tape measures down from each piece of wood. This was so that I could aim a laser level (belonging to my neighbor Sean - thanks for letting me borrow this again) at each tape measure and get an accurate height reading on the gunwale mark at each beam bulkhead. Other builder have done similar things. I aimed the level at a point on the tape measures about 26" below the actual gunwale line; that way the level can "see" the tape measure at all four points.
Here's a rough sketch of the method, excuse the sloppy freehand drawing: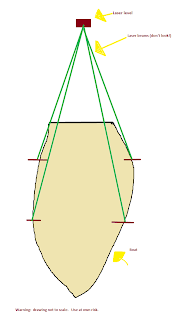 Here's a tape measure hanging down; after awhile I scrounged for every tape measure we had in the house so I didn't have to keep moving it around:
 ...and remove the jack. Yeah I have a big cleanup job under the strongback someday.
I couldn't get all four corners level after 1/2 day of fiddling with it, and sent mail to the F22 builders group on google asking how close the level needs to be. Ian himself replied offline and told me to check sheet 49 where he talks about this. Darn - hate to waste people's time when the answer is in the manual.
I did figure out that one problem was due to the strongback or the cradles "settling" after I'd remove the jack. After that, I was able to get three corners level and the fourth out by only 1/16". According to Ian and the plans this is plenty good enough. Now I'm no longer worried about my lopsided boat and am looking forward to starting the beam mount installs (but have a lot of work left to do before I get there).
The most accurate gunwale markings I have left are on the beam bulkheads, so I cut out enough of a hole so that I could screw or clamp a small piece of straight wood to each bulkhead. The wood is fixed so that it is even with the gunwale marking. Then I hung tape measures down from each piece of wood. This was so that I could aim a laser level (belonging to my neighbor Sean - thanks for letting me borrow this again) at each tape measure and get an accurate height reading on the gunwale mark at each beam bulkhead. Other builder have done similar things. I aimed the level at a point on the tape measures about 26" below the actual gunwale line; that way the level can "see" the tape measure at all four points.
Here's a rough sketch of the method, excuse the sloppy freehand drawing:
 Here's a tape measure hanging down; after awhile I scrounged for every tape measure we had in the house so I didn't have to keep moving it around:
 The initial readings were actually very very close. When I made my boat cradles, I designed them so that the boat would naturally sit as close to gunwale level as I could get it. The measurements showed all four points within 1.5". Not too bad!

Then I'd screw some extra supports to the strong back to hold the cradle at the new position...
 ...and remove the jack. Yeah I have a big cleanup job under the strongback someday.
I couldn't get all four corners level after 1/2 day of fiddling with it, and sent mail to the F22 builders group on google asking how close the level needs to be. Ian himself replied offline and told me to check sheet 49 where he talks about this. Darn - hate to waste people's time when the answer is in the manual.
I did figure out that one problem was due to the strongback or the cradles "settling" after I'd remove the jack. After that, I was able to get three corners level and the fourth out by only 1/16". According to Ian and the plans this is plenty good enough. Now I'm no longer worried about my lopsided boat and am looking forward to starting the beam mount installs (but have a lot of work left to do before I get there).
R.I.P Scale #1
My old electronic scale seemed to be taking longer and longer to zero out. I hadn't been exactly super careful about keeping it clean either . So I decided it had to go to scale heaven; rest in peace, Scale #1:
 Welcome to the world, Scale #2:
 Welcome to the world, Scale #2:
Saturday, May 9, 2009
Rudder web reinforcement
Woke up to a strange sensation this morning: didn't feel like I had to be at work for most of the weekend. It was about time for a break anyway - "all work and no play", etc.
I wasn't able to spend all day on the boat unfortunately. Had to run some errands, and mow the yard, but then I got busy cleaning out the cobwebs from the boat tent. I had left a 1/2 gallon of S3 laminating resin in the garage over the winter and it had crystallized pretty badly, so I also had to do the hot water bath treatment to clean that up. Just to get back into things, I decided to do the additional rudder web reinforcement that Ian had sent out via email since it looked like a simple job. Here's the first three layers of uni over the top:
 It's been so long that I had to look up the S3 resin-hardener ratios online before starting, since I couldn't be sure I remembered them accurately. Here's the job done with the final reinforcements on and peelplyed:
 Not much to see in those pictures, I know.
I also caught up a bit last night with everyone else's building blogs - wow. You guys out there have been really productive - good job everyone.
It was a beautiful day today, by the way:
 Finally, something slightly off-topic (but what the heck it's my blog right?). My wife and I are getting ready to build a new house, so that's another reason I've not been engaged on the boat as much as I would have liked. If anyone's interested, there's a link to a new house blog at the bottom right of the page that I'm going to use to track our progress and capture the experience. We should be breaking ground very soon, then construction is estimated to take 8-12 months. We will be sad to leave our current neighbors after nearly twelve years, but we're excited about the new location. Anyway, this gives me some things to keep in mind this year as I'm working on the boat: I need to be careful not to do anything that will make it difficult to move the boat, e.g. like starting on the beam mounts and not finishing them! I'll also need to research and buy a trailer this year. So....look for an unfinished F22 being towed down a local Seattle freeway, sometime around Christmas... :)
Subscribe to:
Posts (Atom)
