Tuesday, July 28, 2009

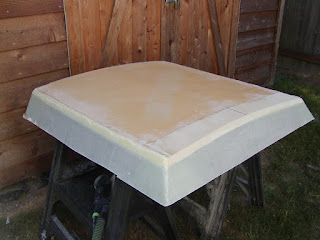
Cabin poptop hatch unmolded

Monday night I laminated an extra layer of A on the inside surface of the hatch (since the plans say A-core-A, and the inside only had B). Today I unmolded the hatch and it doesn't look too bad:

And:

Clearly it will need some trimming (both to level it out, and to shorten the sides) but I'm feeling better that it doesn't look too lopsided or otherwise unsalvageable. I plan to clamp some temporary wood supports to the hatch coamings on the boat to hold the hatch up, then scribe a trim line so the hatch fits reasonably close to the deck.

I also laminated a layer of A around the bottom edge of my settee stiffeners. Wrapping that relatively heavy glass around a 3/8" edge is hard. I routed a curve on both sides, sanded it smooth, and put a thin layer of bog on the edge and sides to help hold the glass in place, but it still kept wanting to lift off from that edge. So I brute-forced the job: continually pulling the edges of the peel-ply down on each side to force the glass back around the curve, until the epoxy finally started to setup hard. A fun twenty minutes... Clamping is another option but a clamp hard enough to hold always seems to leave indentations in the glass; not sure which option is worse. Anyway it's done and both stiffeners are sitting on top of the boat; they should be nearly post-cured after tomorrow's anticipated 100 deg F day.

Sunday, July 26, 2009

Cabin hatch cover mess

My wife and I celebrated 21 years of marriage last week - yay us! Not bad for a couple of kids who were initially only given six months to make it. We didn't do anything fancy (my wife is saving up for something big on number 25), but we did spend all day Saturday driving over to see Grand Coulee Dam; this may not sound very romantic but we both enjoy looking at monumental engineering accomplishments, plus it's a nice long drive so we get to spend time together (Hoover Dam is another one of our favorites). Here I am in front of the dam:

Anyway, that trip plus a busy work week means I haven't got much done on the boat. Today I got a late start (slept in after the trip); first I taped the port settee that I glued in last Tuesday. Then I made a four-sided mold\form for the main cabin hatch cover:

In retrospect, this was a stupid way to do it. The hatch cover meets the front angled mold plate in a a compound curve that is basically impossible to get right with hand-trimming. Don't do it this way, follow Menno's example by laminating the back and sides first, then trim off the front at an angle, then do the front. I spent what seemed like forever trying to get the front of the hatch to fit against the mold, at the same time as levelling the hatch cover within all four sides (and of course you're constantly afraid that you'll trim it too far, which makes the whole process go slower). Finally this is where I decided to leave it (you can't really tell, but I used an epoxy fillet in each corners to form a radius):

You can see that the hatch is not quite level within the form....I will have to trim the hatch edges to make it level. Or maybe I'll leave the rear of the hatch higher than the front, for a "hot rod" look. I got the inside laminated and then quit for the day:

And darn it, I didn't sand out the cockpit compartment primer yet...one thing for sure, that stuff is hard after baking in the tent all week. :(

Sunday, July 19, 2009

Multiple small things going on

Made slow progress this week. I've started on the main hatch cover, by extending the edges of the cutout:

The curvature of the long side extensions did not quite match the rest of the cutout (they don't curve "down" enough), and I will have to long-board them or something to get them to look ok.

I have started making the 4" stiffener extensions for underneath the main cabin settees:

I am still unsure about what to do with the under-settee space (choices are, enclose into storage compartments, versus netting for hanging "loose" storage). Netting seems quickest and easiest for sure - if anyone else has gone this route, would you drop me a line and let me know how well it works?

Three generous coats of primer have been applied inside the cockpit compartments:

I almost started sanding them out today, but decided to wait longer to ensure the primer has cured nice and hard. I am using some left over System Three two-part primer and gray paint (from my 8' rowboat project) for these compartments. The primer did a nice job of covering up many of the smaller dings in the compartments; I think it will look good enough when I'm done.

The port settee has been glued into place, on top of the pre-formed flanges. Back when I did these flanges (a year ago?), I experimented with taping a layer of plastic, then peelply, around the edge of the settee, to use the settee itself as a mold. Unfortunately the tape holding the peelply and plastic keep slipping off, and it turned into a disaster. The resulting flange was far from even or flat. To counteract this, I put a small strip of masking-tape-covered wood under the tape, then screwed into it from above, to try to clamp the tape to the settee:

Here's a picture of the under-cockpit passageway, looking forward from the aft-cabin:

This next picture is a bit dark, sorry. It doesn't show much...

...except for the dark border around the aft-cabin hatch. I formed a 2 1/2" flange around the hatch (on the interior side) and glassed it over: this is because the installation instructions for my hatch say that a 3/4" flange depth is required. One nice side-effect is that the hatch hole has been dramatically stiffened.

Tuesday, July 14, 2009

Cockpit drain holes

Although I was tempted to just glue my cockpit seats on so as to maintain the visible forward progress, I bowed to others' wisdom and decided to paint out the cockpit compartments first. Note: although I am not trying to win the "Best Little Cockpit Compartments in Texas" competition (that honor will go to Ed), I do want things to be smooth enough that blindly sticking a hand in there will not result in any scratches from errant fiberglass spikes. So I first sanded things down, then applied a thin layer of my Alexseal fairing compound:

I have been thinking of trying a home-made fairing compound; the Alexseal stuff cures really hard and is difficult to sand. Isn't that what micro-balloons are for, to make an easy-sanding mixture? Unfortunately I still have a few gallons of Alexseal left to use up, and there's no way I'm wasting that expensive stuff!

I am really kicking myself for not cutting out the drain holes in the cockpit seat fronts before taping them in place. One reason I was thinking that it would better to do this post-taping was because the extra cockpit deck foam would would need to be taken into account. I should have just done the drain holes anyway, but made them 3/8" higher! I think (deep-down) I was simply postponing a simple job so I could get immediate visual gratification by taping the seat fronts in....bad habit for a boat builder. Long story short, I got to spend some time today carving out some drain holes. First I used a Rotozip to get the rough outline cut open, then I used the Fein Multimaster to smooth out the entry from the cockpit deck. Digging the foam edges was a bit tougher, but I found that a paint can opener tool (with the little hooked end that goes under the edge of the paint can lid) worked well for this, in this little space. Here's the port drain hole; you can also see the external drain hole:

It would have looked much cleaner if I had done this before bulkhead install, but I'm confident I have sufficient drain capacity, per the plans.

The foam edges of all four drain holes have dug out and filled with bog.

I was not looking forward to sanding inside these compartments; my Festool RO125 sander is too big to work well in these spaces. I tried using an old Makita orbital palm sander we had in the garage, but that thing was so torquey that it was hard to manage. I treated myself to a new Festool DTS 400 sander after work today:

The new sander really worked well, and the dust collection is (as before) very nice. Merry christmas to me...!

When I was in the aft cabin this past weekend, I got a chance to examine my rudder web taping job. It's not...pretty. I cut some scrap pieces of foam-cored laminate into the shape of the rudder web access holes, and will glue them to a couple layers of A glass to form a flange (same thing Menno did for this bow bulkhead access hole), so that this area can be covered up.

Sunday, July 12, 2009

Aft bunktop and extra cockpit deck foam completed

Nothing big to report this week (i.e., cockpit seats aren't glued in yet) but I did get several small items done.

The rest of the B glass behind the main cabin hatch flange is done. I must say, that having this flange finished has totally changed, for the better, the ease of entry into the main cabin. Even as big as I am, now I can swing myself into the main cabin with ease, and not worry about hurting anything. I can stand on the bottom flange and it's just rock-solid, making it a nice staging point for getting around.

The main cabin hatch gussets have been laminated over.

All of the pre-formed cockpit tape flanges are finished. I need to make a decision soon on whether I'm going to paint-out the interior of these compartments before glueing the seats on. I am leaning that direction though.

Tip: I find the pre-formed tape flanges to be quite flexible after removing the mold. To stiffen them up, the very next day I coat the glueing surface of the tapes with a thin layer of bog. Then when I sand it later, I'm sanding the bog and not the glass, which makes it easy to get a nice rough surface. There's probably a tiny weight penalty with this approach, but better that than a poor bond between the flanges and the cockpit seat (esp the beam bulkhead flanges).

The edges of the cockpit compartment hatches, and the aft-cabin hatch, have been dug-out and filled with bog.

I got tired of looking at the missing second half of the aft-cabin bunktop, and so it has been glued in-place:

...and taped:

I think this was the first time I've ever been in the aft-cabin with the boat in the upright position...there is LOTS of room back there. Makes me glad I'm building this model.

I glued in the the second layer of foam for the cockpit deck out of smaller scraps, using pieces of wood to hold them down:

Dry-fitting\trimming the A glass over the new foam layer:

And then in the middle of laminating:

Things are moving right along.

Take me out to the ballgame

I'm not that much of a baseball fan, but my wife and I do like to go see a Seattle Mariners game once or twice a year. Today we watched them play the Texas Rangers - yay, we won; 5-3!

This was at the beginning of the fifth inning (if you don't believe me, you can check the scoreboard :):

I try to get reasonably good seats since we so rarely go to these games; today's seats were great, we were in row 31 and nearly behind home plate as you can see. Makes foul-ball action quite exciting; I was never close enough to get a hand on one, but one did whiz by only 5'-6' over my head.

The baseball stadium in Seattle has a neat feature in that its roof is retractable. You can read more about it at Wikipedia; today was the first time we've been there that they've closed the roof during the game; it was cool to watch. Contrast the picture above, with the following picture which has the roof almost closed:

The roof only takes ten minutes to close (not air-tight, it's designed more like a giant umbrella), which is nice when the rain starts to come down.

Lastly: while it's fun to watch a baseball game occasionally, I was telling my wife we should start going to some minor-league games again. For example, the Everett Aquasox (single-A affiliate of the Mariners); we've been to a couple of their games and the action is just so much more "in your face": instead of thirty rows back, you're less than ten rows back and MUCH closer to the field. Also, the minor league players, at least in the games I've been too, really give it 110% effort. You do see more mistakes being made, but that just makes things more exciting. And Everett (about 30 minutes north of Seattle) is far easier to drive to than downtown Seattle.

Sunday, July 5, 2009

Weekend update

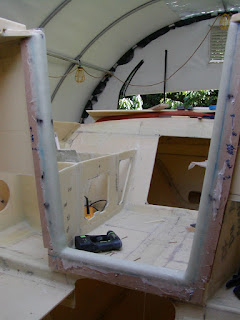
It was a short work day today on the boat, but I made some progress. The cabin flange has been trimmed up, and the under-side B glass (two layers) has been done on the bottom portion of the flange:

The main cabin hatch coamings are all laminated:

The warm weather was very helpful in getting the glass to cure quickly around those tight curves. ("Warm" is relative of course; personally, I start to melt over 90 deg F or so... :). I have not yet laminated or filled the foam edge of the gusset; will be soon now that the coamings are done.

And some more progress on the cockpit seat flanges:

See how some of the tape edges are nicely trimmed and squared up? I discovered that a Fein Multimaster tool (borrowed from my neighbor Bill - thanks!) does a spectacular job of easily trimming these up. I also used it to trim the cabin flange back. If I had known about it, it would have also done a great job trimming the beam mount LFS flanges. This tool is going on my Christmas list for sure.

It's not shown in any pictures, but I also added a second layer of C glass to the doubler plates on all beam mounts. The original plans only specified one layer, so that's what I did (a few weeks back). I was breezing through the last plan update (May 2009) thinking that I could probably ignore everything in that update since it's primarily focused on the new style beam mounts; then I noticed the new beam mount sheets call for TWO layers of C glass over the doubler plates...so I added the extra layer, just to be on the safe side.

Saturday, July 4, 2009

Main cabin flange

The plans call for a heavily reinforced flange around the main-cabin entrance\hatch. I made up mold plates yesterday and then installed them this morning:

The straight blue lines are a reminder to me to overlap the glass at least that far, so I have enough to trim later on. Here's a view from above:

I laminated the bottom first (doing bottom and sides at the same time is left as an exercise for the adventurous reader):

With sides in place:

Side view after removing the mold plates:

All of this work was aided by the fact that we've been having a very warm weekend (high 80's deg F), so I got nice fast cures. Even so, I didn't watch the bottom laminate close enough and it cured into a slightly curved shape, instead of a flat flange with rounded edges. Ah well, could have been worse.

Here's how it looks from outside:

It would have been better to do this big flange before the cockpit seat fronts, but it worked out okay.

Finally, it's been a long couple of days in the sauna-tent, but I'm feeling good about my progress lately:

Tomorrow, I'll trim the flange and laminate the B glass on the other side.

More cockpit work

I've decided to move ahead with the cockpit compartment plan in my last post. Here's one of the new bulkheads in place:

You can also see where I drew a line around the bottom edge of the cockpit seat, so I'd have a guideline for constructing pre-formed tapes if necessary - which it will be for the two aftmost compartments, unfortunately.

Safety compartment bulkhead set in place, along with both hatch holes cut:

Cutting the exterior hatch hole in the picture above made me a bit nervous, but I think it will look okay:

I moved the placement of the safety compartment from port (where it was in my plan, last post) to starboard after very careful consideration. Namely: I'll normally be towing the boat in the right-hand lane most of the time, and with the safety compartment on the starboard side passing drivers won't be able to see it. :)

Here I'm working out the placement of the hatch for the semi-dry compartment, and the access hole for the wet compartment:

One of the hatches set in place:

And voila, all the holes are cut:

There's no real guidance in the plans for how far away from the beam bulkhead any access holes should be. (Yes there is a warning about drain holes, but I don't think that's the same as an access hole). So I just used my best judgement, helped along by reassurance by some pictures of other boats with a similar arrangement.

As mentioned, several of my cockpit compartments require pre-forming of tape flanges. I hate having to make these, and I bet I'm not the only one: they just never look as good as tape that was laminated in-place. So I tried to be creative and come up with a way to make a flange that wouldn't end up looking like a dog's breakfast:

It's just a short piece of pine, with the top edges rounded-over, and a couple of screwing flange supports attached. The supports don't extend all the way to the front so I have room to smooth the tape out against the hull side. I'm not sure it was worth even this little effort, but it didn't turn out too bad:

See that white stripe thing extending across the top of the flange\tape? I didn't cover that portion of the mold with masking tape - duh. Such an idiot. Good thing I removed the mold while the tape was still green, or it would have been a real mess.

One more picture of my flange-making efforts:

I won't do pre-made flanges for the compartments that are open to the cabin interior, but I've decided to do complete flanges for all the other compartments. I just don't see how I could do a very good job of taping while working through the two access holes, even if the boat was inverted.

I'm getting excited about glueing on the cockpit seats, but I have almost decided to first do some (rough) fairing, priming, and painting of these compartments while I still have good access to them. It will be just impossible to do any quality work on them later through the access holes.

Wednesday, July 1, 2009

Cockpit compartments?

I spent too much time today staring at the plans and at other builder blogs, trying to get a handle on how I'm going to subdivide the under-seating area in the cockpit. Here's one possible design I came up with:

Obviously I'm trading off those big interior compartments for more "semi-dry" storage for the cockpit. But I think this is a reasonable tradeoff, since this is an aft-cabin model (ie, there's plenty more storage in the rear). The small space behind the aft beam mounts will be made into a "wet" compartment, so that there is at least one path for water to drain out of the cockpit. If anyone has feedback on this, I'd love to hear it....very soon :), before I started taping the sub-compartment bulkheads.

I dry-fitted the starboard cockpit seat tonight...it needed only minor trimming (corners, etc) to fit into place:

Onwards and upwards...