Tuesday, July 31, 2012
Poptop working
My poptop is built almost exactly to per-plan spec; I "upgraded" by using SS316 hardware whereever possible. I had built some of the parts at my old house, but had let myself get stalled trying to figure out how to produce the slight angle that the plastic pieces were supposed to have. Well after some eyeballing and playing around with a protractor, I finally settled on 8 degrees as the proper offset so that the tracks would fit well against my poptop. Here is what that looked like, with the jib track slide attached:
Producing four such blocks that are completely identical seemed to be a challenge, but it only took two tries. (Cutting UHMW plastic with the tablesaw makes the garage smell like I'm burning candles...) The poptop appears to be now fully operational; this is just with only a few screws to hold the tracks in place):
It slides pretty easily already but I think it will get easier once it is installed for the final time and I add some grease to the slides (and some stop-screws to keep the tracks from sliding off the end). Here is an inside view when closed:
Lastly, my hardware collection:
I may spend time later rounding off the sharp edges and polishing the aluminum....but for now this job is done, time to move on to the next thing.
Producing four such blocks that are completely identical seemed to be a challenge, but it only took two tries. (Cutting UHMW plastic with the tablesaw makes the garage smell like I'm burning candles...) The poptop appears to be now fully operational; this is just with only a few screws to hold the tracks in place):
It slides pretty easily already but I think it will get easier once it is installed for the final time and I add some grease to the slides (and some stop-screws to keep the tracks from sliding off the end). Here is an inside view when closed:
Lastly, my hardware collection:
I may spend time later rounding off the sharp edges and polishing the aluminum....but for now this job is done, time to move on to the next thing.
Monday, July 30, 2012
Boat tent lives again
My faithful boat tent has been in hibernation since we moved. I had always planned on resurrecting it once it was time to paint the boat; unfortunately, initial fairing on the cabin sides has convinced me that fairing the whole boat would destroy our nice garage with dust and whatnot (not to mention primer spraying). So I decided it was time to set it up again:
If you look closely at the picture above, you can see where I brought in several yards of new gravel (from Cadman) to level out that part of the "driveway". I don't think it was perfectly level, but good enough. Then I started setting up the tent again - overall it turned out great, no loss of parts from the move and I got it up with about a day's worth of work. Here's a view from inside the garage:
My son helped me maneuver the boat out of the garage and into the tent; here it is starting to emerge:
Here's a sight not often seen in the middle of a Pacific NW forest:
Another view:
I laid down some cheap OSB boards to make a "floor" in the tent; here's the boat after it was inside:
In other news, my outboard motor mount did not work out so well - not enough room for the motor to pivot all the way up. So much for measure twice, epoxy once. Now I get to saw it off and start over. Will post some pictures on that fairly soon.
If you look closely at the picture above, you can see where I brought in several yards of new gravel (from Cadman) to level out that part of the "driveway". I don't think it was perfectly level, but good enough. Then I started setting up the tent again - overall it turned out great, no loss of parts from the move and I got it up with about a day's worth of work. Here's a view from inside the garage:
My son helped me maneuver the boat out of the garage and into the tent; here it is starting to emerge:
Here's a sight not often seen in the middle of a Pacific NW forest:
Another view:
I laid down some cheap OSB boards to make a "floor" in the tent; here's the boat after it was inside:
In other news, my outboard motor mount did not work out so well - not enough room for the motor to pivot all the way up. So much for measure twice, epoxy once. Now I get to saw it off and start over. Will post some pictures on that fairly soon.
Wednesday, July 25, 2012
Wingnet tubing rails
I chose to use actual fiberglass tubing for my wingnet rails, instead of PVC. Partly this is because I am worried about the weight of the boat (PVC tubing requires an extra layer of glass), and partly because the rails built from PVC-tube have always struck me as slightly "fat" looking - I was able to use 5/8" ID glass tubing with 1/16" wall thickness. Ian had previously approved the joining together of smaller (4' long) glass tubing for this application; so I built a small jig to align the tubes and made the joins with 6oz cloth tape (since it was thinner and I was worried about bulges....but one join broke during installation and had to be redone):
I did not obsess on precise placement of the tubing; I used screws to hold the tubing against the boat (thought this would be hard, it wasn't), eyeballed it a bit and made some minor adjustments, and then called it good:
Initial bogging to allow removal of the screws:
Fillet buildup of one of the rails:
Poor-man's vacuum bagging was done on all four rails:
With two-three layers of glass in spots (due to overlaps, etc) the laminate wanted to lift quite a bit - I suggest being conservative with the fillet radius. Real vacuum bagging would have been useful here if I felt like taking the time to do it, but instead I just baby-sat the laminate keeping the glass in position until the fillet material started to take hold. I still had some bubbles that required injecting with thickened epoxy, but nothing too bad. End result after cleaning up excess tubing looks pretty good:
I did not obsess on precise placement of the tubing; I used screws to hold the tubing against the boat (thought this would be hard, it wasn't), eyeballed it a bit and made some minor adjustments, and then called it good:
Initial bogging to allow removal of the screws:
Fillet buildup of one of the rails:
Poor-man's vacuum bagging was done on all four rails:
With two-three layers of glass in spots (due to overlaps, etc) the laminate wanted to lift quite a bit - I suggest being conservative with the fillet radius. Real vacuum bagging would have been useful here if I felt like taking the time to do it, but instead I just baby-sat the laminate keeping the glass in position until the fillet material started to take hold. I still had some bubbles that required injecting with thickened epoxy, but nothing too bad. End result after cleaning up excess tubing looks pretty good:
Glad to have this behind me... :-)
Happy to report that all beam mount exteriors are completely glassed as well. I have started fairing the cabin sides to prepare for window cutouts, using the notched-trowel method. Finally, I am also working on an outboard engine mount. More details soon...
Monday, July 16, 2012
Starting up again
So...I am finally back to building again. I have been catching up with other folks' blogs and I'm impressed with the progress (way to go Menno and Tor). Me though...I am in my sixth year of building. I kept hoping for the boat building fairies to show up and finish the job, but no joy. Bottom line, these projects don't get finished by themselves and so it's well past time to get my rear back in gear. Some good building advice I have heard in the past: "just get on with it already".
It has been so long that I went back and re-read the plans, and looked the boat over carefully, to make sure I knew where I was. I decided to start off doing a little bit each day on the exterior beam mounts. These are tricky laminations and I am glad I am doing them in warm weather. Here's the boat rolled on its side to make it easier to work on the mounts:
Here's an exterior mount all nicely shaped and ready to laminate:
This was the first beam mount I did, and it was all laid up in one go:
It actually turned out great, but the other mounts I have been doing piece-by-piece...less stressful that way, easier to peel-ply, and I want to be sure these are done right. Port side mounts are now completely done, and starboard is a few days away from being done.
In a week I will be on vacation and plan to spend it at home on the boat (intermingled with a few day trips with my wife). I don't want to make any predictions, but I would really like to have the boat faired and painted before vacation is over. I may not get it in the water this year, but hopefully it will be lacking only a trailer, mast, and rigging.
P.S. In the personal news department, my daughter got married last year, and one year later, gave us our first granddaughter (easily the world's cutest - trust me). I get to see her quite a bit and she is a joy...life is just too short sometimes. Of course, now I really need to finish the boat so she can go sailing with her grandpa. We also became foster-parents a little over a year ago, and that too has been an incredible difficult and fulfilling experience (all at the same time). So this has definitely a busy year - but as I said above, it's time to finish the boat. :-)
It has been so long that I went back and re-read the plans, and looked the boat over carefully, to make sure I knew where I was. I decided to start off doing a little bit each day on the exterior beam mounts. These are tricky laminations and I am glad I am doing them in warm weather. Here's the boat rolled on its side to make it easier to work on the mounts:
Here's an exterior mount all nicely shaped and ready to laminate:
This was the first beam mount I did, and it was all laid up in one go:
It actually turned out great, but the other mounts I have been doing piece-by-piece...less stressful that way, easier to peel-ply, and I want to be sure these are done right. Port side mounts are now completely done, and starboard is a few days away from being done.
In a week I will be on vacation and plan to spend it at home on the boat (intermingled with a few day trips with my wife). I don't want to make any predictions, but I would really like to have the boat faired and painted before vacation is over. I may not get it in the water this year, but hopefully it will be lacking only a trailer, mast, and rigging.
P.S. In the personal news department, my daughter got married last year, and one year later, gave us our first granddaughter (easily the world's cutest - trust me). I get to see her quite a bit and she is a joy...life is just too short sometimes. Of course, now I really need to finish the boat so she can go sailing with her grandpa. We also became foster-parents a little over a year ago, and that too has been an incredible difficult and fulfilling experience (all at the same time). So this has definitely a busy year - but as I said above, it's time to finish the boat. :-)
Sunday, September 19, 2010
No workee on the boat
Unfortunately this has been a very bad summer at work, with a lot of late nights and weekend work. I am saddened by the loss of much warm summer weather. I didn't intend to be on the Five-Year Boatbuilding Plan, but it may be turning out that way.
I was able to take this previous Friday off; my wife and I spent a couple of days in Port Townsend, WA in order to spend some time together. While I did not have any ulterior motives :), some of you may know that Port Townsend is the home of the Wooden Boat Foundation, (and an annual Wooden Boat Festival, although that was last week). While an F22 is not a wooden boat, it was fun just being around real boats, both in the shop and those that have made it onto the water (the town has a vibrant waterfront; when we were there several cruisers were moored offshore - no multihulls though).
The Wooden Boat Foundation has a spectacularly nice shop right on the waterfront. Most of us would kill to have such nice working quarters:
I was able to take this previous Friday off; my wife and I spent a couple of days in Port Townsend, WA in order to spend some time together. While I did not have any ulterior motives :), some of you may know that Port Townsend is the home of the Wooden Boat Foundation, (and an annual Wooden Boat Festival, although that was last week). While an F22 is not a wooden boat, it was fun just being around real boats, both in the shop and those that have made it onto the water (the town has a vibrant waterfront; when we were there several cruisers were moored offshore - no multihulls though).
The Wooden Boat Foundation has a spectacularly nice shop right on the waterfront. Most of us would kill to have such nice working quarters:
Here's a view looking the other direction from up above on the viewing balcony:
The shop is incredibly accessible to the public. Visitors are allowed to simply walk right in and view the proceedings, just about as close as you could want.
This made me chuckle:
In between walking all over town and visiting antique shops, I was also able to sneak in some visits to Pygmy Boats and Brion Toss Riggers.
Anyway, hope all is well out there in the F22 boat building world.
Thursday, June 3, 2010
Extra layer of cockpit seat foam
Tuesday night I did the final taping on the settee backs - phew, glad that's over. I admit my interior is very basic, but at least it looks like a completed basic interior. I have a few minor upside-taping jobs that will wait until I flip the hull over, but for the most part the interior is done (well, I am contemplating adding a couple of shelves in the aft cabin :)).
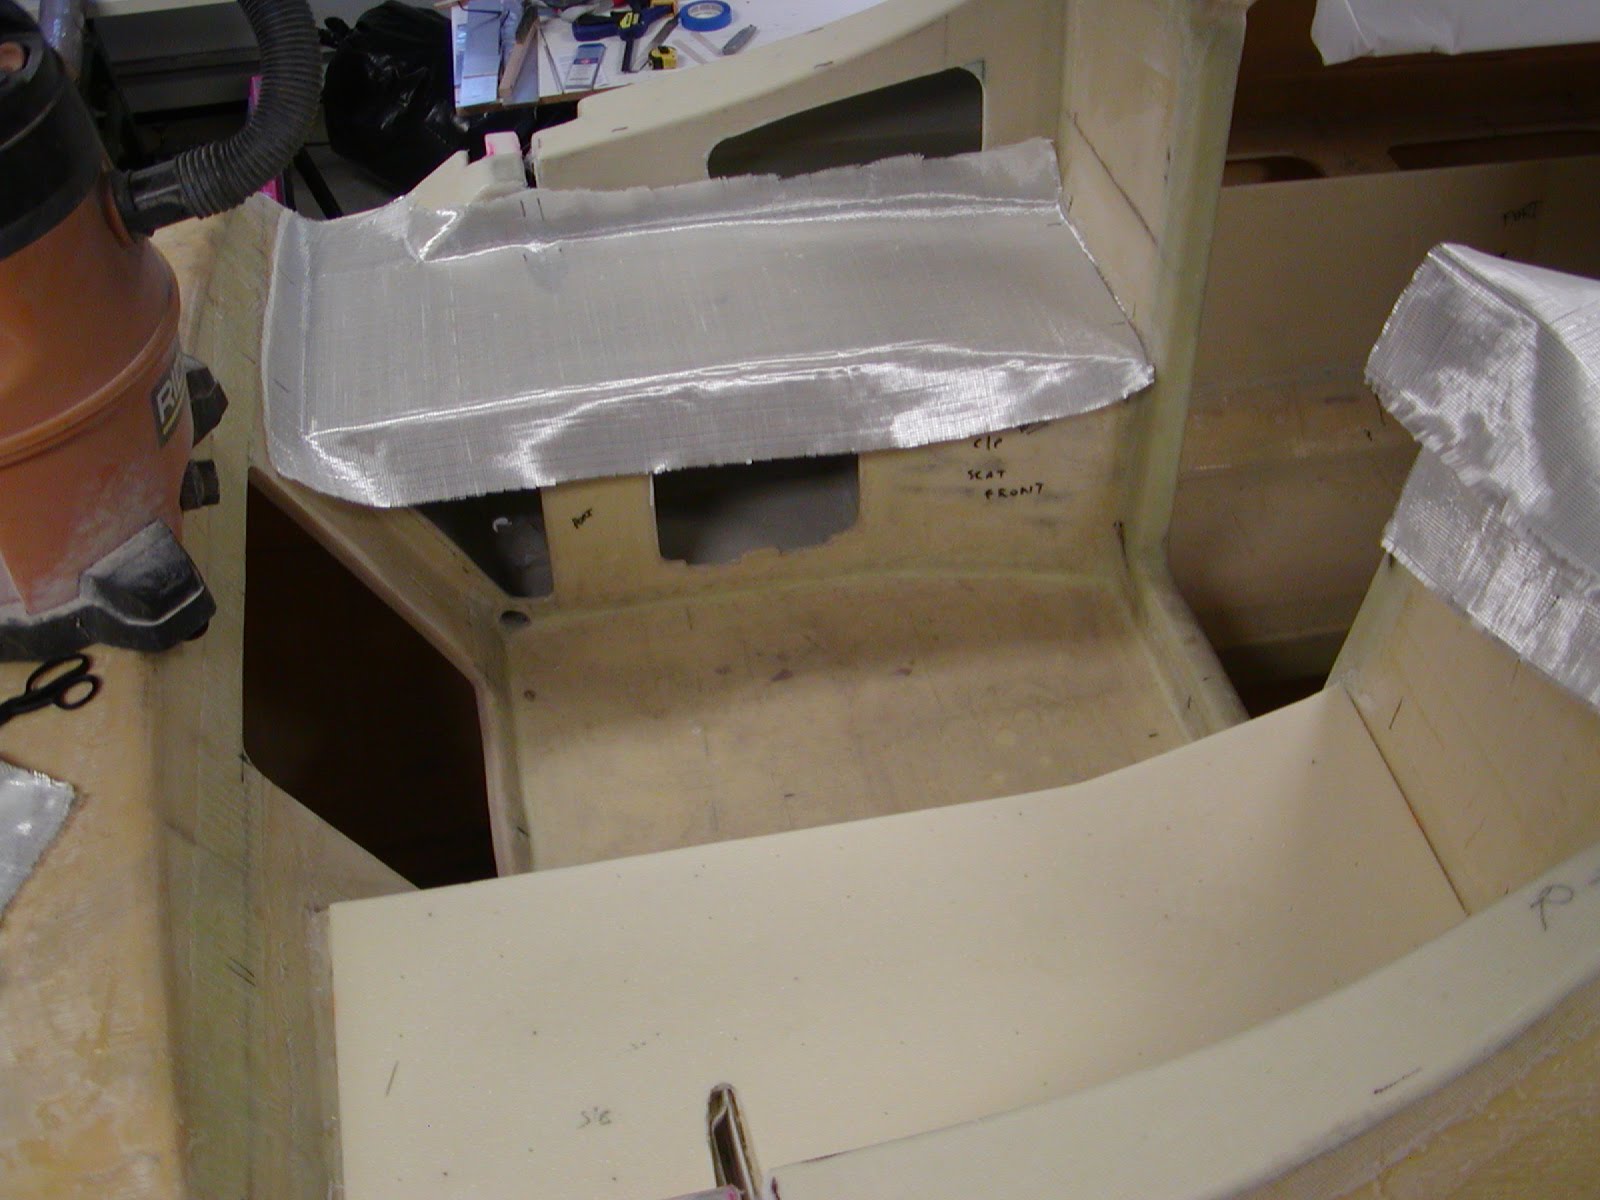
Wednesday night I cut and fitted the extra cockpit seat foam layers, and glued it on with bog and wood blocks to hold it down. I tried to relieve the bottom of it in various spots so that it would lie flat as possible (e.g., over the extra uni covering the ends of the aft beam bulkheads).
And tonight, after trimming up the raw foam and rounding over the edges, I laminated the top of the extra seat layers. Port side dryfitted:
Wednesday night I cut and fitted the extra cockpit seat foam layers, and glued it on with bog and wood blocks to hold it down. I tried to relieve the bottom of it in various spots so that it would lie flat as possible (e.g., over the extra uni covering the ends of the aft beam bulkheads).
And tonight, after trimming up the raw foam and rounding over the edges, I laminated the top of the extra seat layers. Port side dryfitted:
Here's a rare picture from the middle of the job (usually I don't like to stop when I'm "on the clock"):
Onwards and upwards. This weekend I hope to get the boat out of the cradles and turned on its side so I can start doing the exterior laminate on the beam mounts.
Subscribe to:
Posts (Atom)