Saturday, February 17, 2007

Float deck bottoms finished

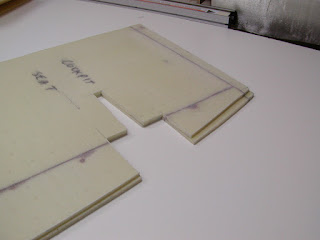
Today was a very nice Northwest February day, and I took advantage of it in order to get my float deck bottoms all finished. (Got up to about 62deg F at my house today! Not bad for Feb.).

Last night I put an extra sealing coat of epoxy on the plywood inserts to prepare for laminating. While waiting for the sun to warm things up...

(go sun go!)
...I worked on getting the deck stringers all cut up, mitered, and smoothed over:

(My numbering scheme for the stringers was 1 through 5, starting with 1 for the forward-most stringer. In case you're wondering later when you see numbers in the pictures.)

Per the plans, the underside laminate is not supposed to go all the way to the edge as this might create a hard edge during fairing. To accomplish this, I was able to use a trick I had read about in the System Three Epoxy Book guide (this method might be old hat to others, but it was the first time I've actually had an opportunity to use it), namely I put a strip of 3/4" masking tape all around the perimeter of the decks:

In the above picture, you can also see where I've pre-marked the stringer locations. The rough-drawn circles are for the screw-in hatches, but were for reference only -- those won't get cut-out and installed until much later.

Then I cut up all of my fiberglass, including extra reinforcements, and layed it out on the decks:With the temperature nudging 55degF, and the skies blue, I decided it was warm enough to go for it. On to the laminating:


This was my first "large-scale" open-layup laminating effort on this project. I was happy with how smooth it went. I did learn to be frugal with the resin, since you don't want to have to sop up any extra, and the resin will usually go further than you think it will (just have to be patient as it soaks in). On these float decks, it was easy to handle any excess, of course: just squeegee it over to the next section. Eventually I got done with laminating both decks, including reinforcements.

Next I mixed up a batch of putty and glued all of the stringers into their pre-drawn locations. In some cases I didn't get quite enough squeeze-out, and had to go back with extra putty to form small fillets around the base of each stringer. I then wet out the stringer reinforcements one by one in the garage, carried them out to the boat tent, and laid them into position. I didn't want to try to wet these out directly in place on the float deck, and the pre-wetting method worked awesome. However, even with the mitered edges and my extra sanding to smooth the corners over, I still had a tiny bit of trouble getting the cloth to lay smooth around some of the corners -- it kept wanting to bubble up. In the end, I just kept checking these over and over the rest of the day, fixing them as needed until the epoxy started to grip the cloth more firmly. Here's how they looked when done:
At this point, I went and took a break to allow the epoxy time to cure. I needed to remove the masking tape before things got too sticky, but things weren't curing quite fast enough (remember I'm using slow hardener). I ended up taking my heat gun and going around the deck perimeters a couple times to speed up the cure next to the masking tape. Then it was time to cut a line next to the tape, and lift off the tape and (cut-off) laminate as one piece. This worked well and I was very pleased with the edge it left:


After doing this for both decks, and pressing down any lifted cloth (only in a couple of spots), I was done:


(The plans call for some extra fiberglass reinforcements on the top of the decks, but I think I am going to just store them away for now and do it later after installing the decks.)

All in all it was a good day and the results looked outstanding -- I am happy. :)

Tuesday, February 13, 2007

Arggh

I wasn't planning on doing mid-week posts...but will make an exception this time. For future reference, "Arggh" is the sound you make when an email arrives from the boat designer telling you that the fwd bunktop panels you bagged up last weekend, now need an extra bit of "A" laminate near the rear end. Dang it -- I would have preferred to do that under the vacuum bag with the initial laminate. Well, these things happen and there's no sense complaining (I'm really just making noise to hear myself. :)). There were also some small changes to the cockpit seat dimensions but thankfully I had not yet bagged and cut a replacement panel for the one I screwed up a week or so ago. So tonight I cut out the fwd beam bulkheads and the fwd bunk tops, bagged up a new cockpit seat, and laminated the extra A laminate on one side of each fwd bunktops (see the open layup on the counter in the background in this picture):


Once I get the new cockpit seat panel cut out, I will lay it over the previous (good) panel, and see what needs to change. Looking at the new dimensional drawing, I expect the differences to be minimal.

Here is a picture of my collection of flat panel parts, stashed away in the downstairs rec room for safekeeping.

The cockpit seat panel in the bag above, is my last flat panel part. Everything else is done, sans filling in exposed panel edges with putty (a not-very-fun job, but I will be doing it soon).

I think I should be feeling pretty good at this point (cue James Brown lyrics). I sure hope that this building strategy I'm following (build all small parts and flat panels first) works out.

Sunday, February 11, 2007

Progress this week

I made reasonable (but not outstanding) progress this week. I now have both of the fwd beam bulkheads bagged and ready to be traced & cut:

I had not been very happy at the thought of doing an open layup on the fwd bunk tops. At some point I had an eureka, and figured out a way to vacuum bag these long panels on my garage cabinet counter. I was worried about making a mess, so I layed down a plastic sheet beneath the laminate & foam so that the countertop wasn't directly impacted, and attached the bag film directly to the countertop. This approach actually worked out great; the bag held 25" easily and the pump only kicked on every hour or so:


In addition, I've been working on the float decks. I took three sheets of 1/2" plywood and covered my float form frames to make a super long "table"; this then gave me the space to make up each float deck as one single piece (changed my mind on that from before). I cut some foam blanks to a suitable width, glued them together, drew the outlines, and today I finished up by gluing in the high-density inserts:


(the Rube G. thing that's hanging is my homemade heat lamp fixture for assisting with curing epoxy. I threw that together a month or so ago, but was still too chicken to try to laminate the float half. However today's weather was quite mild, it got up to about 60 deg F -- if that keeps up, I may be in business pretty soon.)

That's pretty much where I left things for today. Next work items will be to cut out the fwd bulkhead beams and the fwd bunk tops, laminate the float deck bottoms and attach deck stiffeners, and continue progress on the bow web.

Lastly, something kinda funny (well, now it's funny) happened on Thursday while I was bagging a panel. I was pouring hardener into a mixing cup that was sitting on my scale. For some reason though, I couldn't quite get it topped off to the correct weight. Long story short, the measuring cup I was using had a crack near the bottom, and the crack just happened to be facing away from me. So the unmixed resin\hardener mixture was slowly pouring out this crack in the back, down the back of the scale, and onto (thankfully) the plastic sheeting I keep the counter covered with. Could have made a worse mess but still, what a waste that was -- I had to toss the whole thing since I couldn't be sure of how much resin\hardener was in the cup.

Sunday, February 4, 2007

Panel cutting

I've been vacuum bagging panels pretty steadily the last two weeks (one per day usually), but have simply been laying the panels aside after unbagging them. Today was the day that I got caught up with the tracing and cutting-out backlog. (It's a messy enough job that it's better to get a bunch done at once.)

I had 14 panels to cut out. Some of these needed to be traced from the patterns, others needed to be made up from dimension drawings in the plan book.


This picture is about half-way through the tracing:

Most everything went pretty smooth but due to the large number of parts it did take me close to eight hours in the garage tracing, cutting, and cleaning up the mess (oh poor me :). Here's a picture of the resulting pile of panels:


(The wood thing leaning against the door is my daggerboard case mold, with the rope channel mold in front of it.)

Unfortunately, I did have one screw-up. The cockpit seat panel is a bit interesting. It does not have a pattern, instead you transfer measurements from the plan book, and you need to be careful with this one because the plan book draws the cockpit seat for all models (aft-cockpit + aft-cabin + cuddy-cabin) in one drawing with (mostly) a combined set of dimension marks. The aft-cabin version is the smallest of the three, and it requires doing some minor calculations to compute a couple of dimensions. I must have mis-read the measurements on one of the panels, because this is obviously not right:

The bottom panel has the correct dimensions. Not sure yet if I will try to fix this, or just bag up another panel. I was happy with how close the aft beam mount notch came out on both panels though -- not bad for doing a manual transfer of the dimensions plus jigsaw cutting.

Here is a shot of the mess I made:


I am nearing the end of my flat panel bagging work. Only panels left to do are the front beam bulkhead (2 halves) and the forward bunk top (2 halves), plus fixing or re-doing the cockpit panel. The fwd bunk tops will not fit on my vacuum table board, so they'll be done via open-layup. Another task I need to catch up on is filling in the exposed bulkhead foam edges with putty (already done for those float bulkheads that needed it).

I also spent some time figuring out my strategy for the float decks. At first I was going to do them in one piece, but changed my mind. I'm doing the decks in two pieces, one will be the forward 2/3 of the deck, and the other the aft 1/3. Yesterday I glued together the foam for making the forward deck pieces but didn't get around to doing anything else. I will doing an open hand-layup on these parts due to the length.

Friday, February 2, 2007

First float half

This post will cover my observations on planking my first float half. This is written from memory, about six weeks after the fact.

Ian has commented on how long it should take to to plank a float: it should be done in about two hours. I wish either that I could do it that fast or perhaps the truth is that I wish I had the guts to do it that fast. I didn't do my first float half in two hours -- maybe 6-8 hours, but I was going slow. A couple parts of the process I found semi-frustrating, I'll detail those as I go. I do think I'll be a lot closer to two hours next time. It is definitely not rocket-science. And always remember, "you're not building furniture".

First thing was to mount the keel strip, easy enough:

I then cut a bunch of plank blanks on my table saw at about 8" wide (and ~48" long, because that was the length of my offcuts). The initial procedure was then:

  • Hold the blank in place, flat end against the deck mold piece, pushed down as close to the battens as possible, and make a mark about where the blank should be cut to fit against the keel strip.
  • Go cut the blank at the mark.
  • Push the blank into the float mold, and re-trim the keel cut as necessary. At this point I was only aiming for the keel cut to be "close enough", or maybe just a shade too long.
  • Take the heat gun and use it to heat up the plank while molding it against the battens. Outside temperature was about 35-45 degrees F, so conditions weren't the best and the corecell was slow to heat up and mold. I didn't time myself, but if memory serves I was spending at least 8-10 minutes on each plank.
  • Once the plank was reasonable curved into the right shape, I would then turn my attention to the keel cut. The plank foam is supposed to meet the keel foam at the angle given it from the battens; it's your job to miter that join so that the two foam pieces meet evenly. I may have been too anal about this, but it was certainly the most frustrating part for me. Kinda hard to use any kind of precision mitering tool (at least I couldn't think of a way, and precision isn't really called for), so I ended up just using a RO sander: I'd eyeball the joint, then sand down the keel end of the plank to about where I think it should be. Test-fit, then repeat as needed. On a couple of planks, too-much sanding\mitering resulted in the planks no longer meeting the the keel foam at all; these I re-did and saved the blank for a shorter section of the float half.
  • Once a plank was as good as I could get it, I took a cordless drill and drilled two screw holes through each batten so that each hole was an inch from the sides of the plank. This goes fast.
  • Then I would grab a handful of screws and get one started in each of the holes from underneath the float. Then it was just a matter of holding the plank down with one hand from above, and running the screws up and in to the foam with the cordless drill from beneath. At first I was using temporary clamps on the foam, but quickly discarded that step. The F22 float planks are short enough and narrow enough that you can do the job by hand.
  • I was not edge-glueing as I went. For now I've butted all of the edges together, and will cut a groove later on between them.
  • Things to look out for: 1) don't try to squeeze a slightly-too long plank into the mold; when I did this, it would push against and sometimes distort the keel foam; 2) make sure your screws have adequate holding power. The screws I have been using do not penetrate the foam very far and I sometimes had problems with foam under tension pulling out from the screw, unless I had adequately heat-formed it into place; 3) consider planking the float without the deck mold plate in place (see Ed's site for example) and just cut it to fit after all planks are in. I will do this on my other float halfs.

Here's a picture at the beginning of the job:


And somewhere in the middle:


(I seem to be missing a shot of the fully planked float half, will add one to this post later.)

Other float-related things I've done already are 1) make the chainplates (haven't cut it into two yet); 2) vacuum bag all float bulkheads, plus transoms; 3) make up all 4 stringers, and 4) cut enough 3/4" x 3/4" deck support angle pieces for all four float halves. So there's a big pile of stuff ready to go.

Thursday, February 1, 2007

Strongback and float form frames

Building outside meant I had to figure out how to level and anchor my strongback. I didn't want to pour a temporary slab (a decison I hopefully don't come to regret) and Ian didn't have any suggestions for building on dirt. In the end, I stole an idea from when I built my shed: I'd build the strongback on top of 4"x4" posts running sideways, mounted on top of concrete pier blocks, themselves sitting on top of a packed-down sand base. A picture would probably help here, I guess:


Each of the concrete blocks is dug into the ground a ways, to ensure a comfortable building height. I was careful when digging each hole to not disturb the bottom dirt too much, and filled each hole bottom with a packed-down sand\gravel mix. The saddles on the pier blocks are the adjustable kind, and this allowed me to get all of the beams pretty close to level using a high-quality bubble-level. (A laser level would have been more accurate, but I'm pretty sure I'm close enough.)


Once levelled, I packed more sand\gravel mix around each pier block, re-checked for level, then removed the beams & saddles and layed down my blue poly tarp for a moisture barrier. I cut a small hole in the tarp over each hole in the pier blocks, and inserted the saddle-posts through the tarp into the blocks. Then I put the beams back on, re-checked for level, and secured them with screws to the saddles.


I now had a pretty stable base on which to mount the main strongback frame, built out of 1"x6" boards as described in the plans. This is what it looked like:


After putting in more screws, rechecking level, mounting the station cross-beams, and adding my center-string, I had this:

One of my neighbors has a custom woodworking business that he runs out of his home, and as it turns out he has a CNC machine in his shop. Isn't that great? Long story short, I obtained the DXF files from Ian and my neighbor used his CNC to cut the float form frames for me. I was very pleased with the results:


Next I anchored each form-frame front-to-back, so that they were vertical:

Next up was ripping a pile of battens...


...and mounting them on the form frames: