Friday, August 24, 2007

Float hatches attached

I finished attaching my float hatches today. My goal was to get both floats buttoned up tight, so that I don't get too many animals or insects in them while they sit in the backyard. Recalling my previous near-disaster with the expansion of a heated, enclosed float, I decided to make doing the transom vent holes the first priority.

The transom is one area where it's basically impossible to use machine screws, so I settled for sheet metal screws, attached through a core of high-density epoxy mix. Here's what the starboard looked like, before attaching the cover:

The hole in the middle is obviously the air vent itself; Ian specifies a 2mm hole. I found the suggested SeaDog vent cover to be extremely flimsy and went instead with a Perko model, much more sturdier and nicer looking too IMO:


Attaching the hatches was more tedious than I expected. Obviously you have to drill holes; I did this by first drilling small pilot holes with the hatch in place:

Then drilling the final holes with the hatch removed:

I had been concerned about the putty fill extending deep enough to surround the screw holes but this wasn't a problem; it appears I was pretty aggressive in digging out the core for edge-filling, and each hole appeared to be solidly drilled through epoxy.

Silicon was the hatch-makers' recommended sealant, and although other alternatives exist (3m 4200\5200, LifeSeal, etc) I decided to stick with silicon to make it easy to remove the hatches in future. It was pointed out to me (thanks Henny) that silicon can make future paint jobs quite difficult - hopefully I don't come to regret this.

My procedure was to lay down the silicon bead around the underside of the hatch flange, then lay the hatch in its float hole, push the screws down through each hole, press the hatch down lightly to compress the silicon slightly, then leave it alone. I don't have any pictures of my silicon beads -- it was a warm day and I was trying hard to get each hatch in place immediately after applying silicon.

I don't think I was applying enough silicon on the first few hatches, based on the lack of squeeze-out; I'm not too worried since I know it's under there, but it'll be something to keep an eye on. An idea just occurred to me that I'll have to try: I can do leak-testing with the garden hose.

After leaving the hatches alone for 3-4 hours to cure (probably not a full cure, but that's as long as I was willing to wait), I got started attaching the nuts and washers. I used stainless steel machine screws and nuts purchased at Fisheries Supply in Seattle; it would have been more cost-effective to order in bulk, but I was in a hurry. Unfortunately F.S. was out-of-stock on S.S. lock washers, so I resorted to using flat washers plus some Loctite on each screw.

The large access hatches are pretty easy to do, but the 6" hatches can be tough to maneuver in. I was using nut-drivers which helped a lot but still had to wrap some masking tape around the nut-driver...

...to hold each washer in place, otherwise I was dropping them all the time (buy extra washers and nuts, so you don't find yourself cursing when you drop one into the float). Quite simply, this is a tedious job that can't really be rushed.

The final result:

Both floats are now buttoned up and winterized for a nice PNW winter.

Thursday, August 23, 2007

Port float sprayed and wayed

I sprayed the port float yesterday. Same basic operating parameters (temp, thinning ratio, etc) as for the starboard float. Alas, this paint job did not turn out quite as nice as the other one. I got a lot of runs, and orange peel in lots of spots.

For the runs, it looks like I had the fluid flow adjustment way too high at the beginning and I didn't notice it until the runs started appearing. (I did spray a test pattern, but it's still not easy for me to recognize "good" from "bad".) Fortunately my spray routine had me doing the underside of the rails first, so most of the bad runs are down the inner side of the float. So either I fix them, or I get close-mesh netting that will hide them - probably the latter.

Here's an example (you can see some runs in this one):

And another:

And another:

(See all the dust on top there - either the tent wasn't as air-proof as I thought, or some of the overspray settled as dust, not sure which.)

We also weighed this float -- it came in at 142.8 lbs. Exactly two pounds lighter than the starboard float; I guess the A400 in the port side of this float didn't make as much of a difference as I expected (or more likely, I was just sloppier on this float).

My neighbor is not quite done cutting the form frames for the main hull, so I have been working on mounting the hatches, and creating a cedar blank for the daggerboard. Will cover those details in another post.

Tuesday, August 21, 2007

Spray gun fun

I almost sprayed my port float today. How's that for an informative post?

The trigger on the spray gun has been getting more and more sticky, apparently due to a gummed-up needle spring, so this morning I decided it was high time to break the gun down and do a thorough cleaning. After removing all fourteen screws, eventually I got the two halves of the gun popped apart and (somewhat gleefully) tossed all the gizzards (everything except the two molded gun halves) into a container of solvent.

Trouble came when I went to take the parts back out. I had let some of the O-rings remain on their respective parts, and it turns out that rubber O-rings don't like solvent: it seems to weaken them greatly. I broke three with only gentle handling. Great - now what, Einstein?

Long story short, after first calling Accuspray, then calling each of their local distributors - of which there are apparently only three, and two don't stock Accuspray anymore - and then driving for over an hour to visit the only local retailer with actual parts in stock, I was able to get replacement O-rings for two of the broken ones; they were out-of-stock on the the remaining O-ring's size. After getting home I ordered a repair kit online, but it wouldn't arrive for a few days at least. This was depressing, because I can't make much more progress until both floats are done and placed outside the boat tent. Around five o'clock this evening, I had a brain flash that the spray gun probably wouldn't care if the missing O-ring was genuine Accuspray or not, and a quick trip to a local auto-parts store was sufficient to find a reasonably suitable O-ring (also, it was one hell of a lot cheaper!). The gun is all put back together now and I hope tomorrow will be a good spraying day.

So the bad news is that I lost most of a day. The good news is that I now know how to disassemble my spray gun really well. And I got some education along the way -- when I called Accuspray, they explained that the needle can be removed for cleaning by unscrewing the fluid adjustment knob all the way out, and that it is rarely if ever necessary to disassemble the entire gun. Duh, now you tell me -- chalk up another minor gain on the learning curve.

I did get the starboard float moved outside today. Here it is, in its new home for the next several months (it will be covered by a tarp, which also cover the port float when it is done):

It wasn't very sunny today, but the float still looks pretty good even outside -- it's about a five-foot paint job, IMO. (Tom - for now this is about as good a side-on shot as I can get, hope it works for you.)

Monday, August 20, 2007

Starboard float weighed

My starboard float weighs 144.8 lbs (65.6 kg), without hatches. I wasn't expecting great accuracy since I was using a couple of cheap Sunbeam bathroom scales, however we measured twice and got the same result both times.

In comparison, Ian had previously mentioned (in a F22 builders' update email) that the theoretical weight of one float is 112 lbs (51 kg), without paint (he didn't say if it was with or without hatches). Oliver once posted on the F-boat forum, that his float(s) weighed 132 lbs (60kg). So my float is obviously quite the porker. Some partial excuses for this are:
  • I was not stingy with the fairing putty, to say the least.
  • I put innumerable coats of primer on the float, in my quest for a fair surface.
  • My float has 2-3 lbs of wingnet rail on it; Oliver's didn't have this of course, and I doubt Ian accounted it in his 112lb target either.
  • This float is constructed almost entirely out of A550 corecell. The bulkheads on both floats are A400 (from my initial purchase of offcuts from Noah's), and the port-half of the port float is also A400. I assume Ian's estimate is for 100% A400. So my A550 probably accounts for at least an extra 5 lbs.

So: 144.8 lbs - well, it could have been better, could have been worse. Of course if I really cared about having a fast boat, I'd get my rear on a treadmill and lose a hundred pounds. :-)

Seriously though, it'd be interesting to hear what other builders have come up with for float weights.

Here's my son, helping me man-handle the floats in and out of the cradles on top of the scales:

When you're building a boat, it's often handy to have a strong, 6'4" 16 year old kid around the house. The downside is that he eats a lot. (Somewhere out there, my own father is laughing at me.)

Our weather today continued to be wet and cool and I was unable to spray the port float. However, the port float is now hanging in the tent, wiped-down with de-greaser, and only needs a final tack-off to be ready for spraying. Hopefully tomorrow is nicer.

Sunday, August 19, 2007

Starboard float painted

With the wingnet rails attached and faired, I was just about ready for painting. The last remaining task was to construct some sort of a paint booth. If you search around on the internet, you'll find plenty of ideas for home-grown paint booths (Here is one particularly well-detailed story) and my original goal was to try to build something world-class (you know, good enough for a cancer-lung patient, etc, etc). By Wednesday evening I had found time to purchase some 3/4" PVC tubing and construct the basic frame:

On Saturday morning my wife came outside to help me tent up the plastic over the frame. I made a mistake going with 3/4" tubing and 4mil plastic - the plastic was a bit too heavy, causing the tubing to bow pretty good. (Most recommendations say to use 1" or 2" tubing, but I couldn't resist the price on 3/4" PVC tubing -- you get a 10 foot piece for less than three dollars.) We were able to get the overhead piece up okay, using duct tape to attach it to the frame. When I tried to get the first side-piece up though, it was just not working -- the duct tape didn't have the holding power to support the weight of the plastic. I would suggest using 2 or 3 mil plastic in future. In the end, I decided to give up on my goal of having my own personal Hermetically Sealed Booth (tm), and settled for just the overhead piece and a big piece on the floor to catch overspray. Here's how it looked Saturday morning; this is just about ready for painting:

The above approach worked out better than I might have expected. My boat tent keeps out most of the wind. The overhead plastic keeps most of the bugs and dust from falling down onto the float (lots of bugs fall down after dying in the concentrated heat at the peak of the tent). I also sprayed down the grass and dirt around the perimeter of the ten before spraying, to help keep the dust down. The final finish was remarkably dust-and-contaminate-free (more below).

My initial paint batch consisted of 48 oz of paint (24 base, 24 converter), reduced by 40% using Alexseal's Medium-speed reducer. I also added slightly less than a capful of the top-coat accelerator. Outside temperature was in the low 70 degrees F. This batch size was based on guess work, but it turned out perfect -- it was enough for three coats and I had only about 3-4 ounces of wastage at the end.

Here I'm filling up the paint gun cup to prepare for the third and final coat:

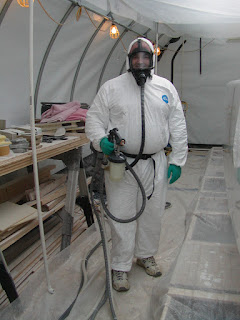
I sprayed in a Tyvek suit, with the full-face respirator that came with my Axispro spray setup:

I look just like the Pillsbury Dough Boy, don't I? :-)

I put the first coat as thin as I could, per the guidance I got from Tim Lackey and others. I accomplished this mainly by moving the gun nice and fast; I slowed down for the 2nd and 3rd coats.

Okay, enough procrastination! Time to answer the $10000 question: how did it turn out? Well, it's not perfect but overall I think it looks pretty good! I did get some orange peel here and there, and also some dull spots. (Need to work on keeping the gun a constant distance from the surface...) I can't see any dust anywhere on the finish, although one big bug did decide to end his life on top of the wingnet rail (his carcass outline will be covered by the net rail eventually). Anyway here's some pictures, you guys can judge for yourselves:

And:

And:

And:

And:

All in all though, I am reasonably satisfied with the results. A few runs here and there, but nothing like I was afraid of. The underside of the wingnet rails was a pain in the arse to spray -- there's even a spot that didn't get any paint at all, I'll have to mask off and fix it using a small brush.

I'll post a few more pics when I get this float outside into the sun.

I was planning on spraying the port float today, but unfortunately it's been raining all day and temperatures are still below 60 deg F. (Where's some of that global warming when you need it?) So I'm going to let the starboard float remain hanging for another day, guess it won't hurt for it to cure a bit longer.

Hopefully tomorrow I can get the port float sprayed, and then it will be full-speed on the main hull. I've already asked my neighbor with the CNC machine to start cutting my main hull form frames, to be ready sometime around Wednesday. I'll need to do some cleanup in the tent and double-check the level on the strongback, but that shouldn't take too long.

Sunday, August 12, 2007

Wingnet rails faired

Progress has been abysmally slow this past week, due to work committments. So here's a brief post, to bring things up to date.

Last Sunday I started putting on the fairing compound, on the rail attachment points:

I have to admit I still cringe, at the ugliness I had to inflict on my floats in order to get these rails attached. :-)

After that, I didn't touch any boat stuff until the following Friday. The fairing compound was cured hard by then, which made sanding it down suck. It finally started to come together though:

Saturday I did some more touchup on the fairing compound, then applied three coats of high-build primer using a brush:

I know I said I'd never brush this stuff on again, but it didn't make much sense to get the spray gun out for such a small job, especially one with such small nooks and crannies.

Today I sanded down the high-build; being reasonably satisfied with the results, I then went ahead and put two coats of finish primer on (looks a lot like the above picture, but with a less-bright white). Hopefully I'll get enough time after work this week to sand those coats down, and get this thing ready for paint (finally - $!#*$).

The rail supports on either side of the large access hatch were positioned with little room to spare, so I checked several times during the fairing to make sure the hatch had enough flat surface on all sides to lie nicely:

The other thing I had time for this weekend, was trimming the daggerboard case sides. Roger Bonnot sent me an email with some pictures showing how he trimmed his (thanks Roger - my return emails bounced for some reason, sorry if it seemed like I was ignoring you.) using a block of wood and a sander. I did mine this way as well and it worked great, much more accurate IMO than feeding it through the table saw (and less chance for mistakes). I used a 3/4" piece of wood, and a 1/4" piece of steel borrowed from a neighbor:

The end-result looked great.

I didn't get around to painting the insides of the case halves yet. Ian replied to my email about the cheekblock assembly, but only to say that it's not ready yet, and to just cut the hole for now. I did some searching on small cheekblocks, and the most likely one I could find was this Schaefer model -- but even that one looked like it would be a bit too wide. Since you're supposed to tap and mount some machine screws before you button up the case, I'm a bit concerned that I don't know exactly what is going to happen here. (Yeah, I realize I'm second-guessing Ian here, shame on me.) Anyway, if any other F22 builders out there have completed the screw mountings for the cheekblock assembly in the case side, would you please drop me a mail with a couple of pics?

Saturday, August 4, 2007

Wingnet rails attached and daggerboard case keel flanges

All week long I've been doing a little bit each day on the wingnet rails. As of today, all rail attachment points are glued and taped to the floats and I should be able to start fairing them tomorrow (albeit two days behind schedule, which is about right for me).

Here's a picture of the port rail deck attachments getting taped:

I did not take the time to mask off the faired surfaces of the rails, and I did get some epoxy here and there that will require sanding later.

For today I had to tape the starboard rail deck attachments, and the under-rail supports on both floats. Taping the under-rail supports requires especially small pieces of glass:

This next picture shows an under-rail support taped in place on both sides of the support. This was not a fun job, because of the small glass pieces (they want to come apart easily) and because of the cramped area between the main rail and the support rail. I did the best I could, but I predict several hours of tedious hand-sanding ahead of me:

I am amazed at the rigidity the rails now have after being attached. They went from being loose, floppy parts to tough, solid parts of the entire float structure - you shake the rail, and you shake the whole float. The only part that wiggles now even a little bit is the bitter ends of the rails that are hanging in mid-air.

My neighbor came over today for a peek at my progress, and when I told him that the rails would be part of the supporting structure for the nets which would support human beings (above the water, no less), he got this very skeptical look on his face. No faith, I swear. :)

I also worked on the daggerboard case some more. Here is the port case half, after unmolding:

Before I did any work on the case halves, I wanted to trim all of the jagged edges off left over the bagging process. The jigsaw on its side worked well to clean up the side glass:

That is not the final cut, of course, it was just a quick-and-dirty job to clean things up.

I also needed to trim the the top and bottom of each case half. In getting ready for this, I discovered that I have made another minor mistake. I now believe that you are initially supposed to leave the foam slightly longer than the final case length; then later when you trim the top and bottom (after bagging) you end up with a full thickness of foam exposed on those edges. I had initially trimmed the case foam to be exactly as long as the specified final case length, and then beveled each edge at 45 degrees. So after trimming to the final case length, there is very little if any foam exposed on the top and bottom, and there is a beveled edge where there should be none. Oops! Well, I don't think it's a big deal - it just means that I'll have to fill in the extra space with putty when I am finally ready to tape the case into the boat. Word to the wise for the rest of you.

Here are both case halves, after trimming top and bottom, and rough-trimming the sides:

I then spent some time sanding the insides of the case halves to a rough 150 grit, and scuffing up the rebated taping areas with 80 grit. Once primed and painted, the inside of the case should turn out glossy smooth.

After that, the next step was to form a keel flange at the bottom of each case half. This requires using a mold plate at the bottom of each half:

Here is the flanges being laminated:

I'll be blocked pretty soon on further daggerboard case progress, because I don't have the details for the cheekblock assembly. I don't think it's that complicated, based on this picture from Ian's web site, but I'd rather get the final plan sheet on this to be sure. So I emailed Ian asking about it.

My wife said something funny to me today. After watching me build stuff for the last several months, she knows by now the basic steps I go through when doing vacuum bagging or wet layups, and she also knows that when I'm in the middle of one these procedures I don't stop for anyone or anything, period. So today, she comes out to the garage to go somewhere, and tells me that I need to drive our daughter to work since she'll be gone. And then she says "So don't start basting anything, because she needs to leave in about a half hour!". Hahaha - "basting". Gotta love her.

Friday, August 3, 2007

Bagging the port daggerboard case half

I got good news from Ian: he told me not to worry about the foam on my starboard case half butting out a bit too far, that I can just flatten it out with putty when I join the two halves and this would distribute the forces just fine. That was quite a relief, so I moved on to the port case half. This one is of course more interesting since it has the rope channel relief to contend with.

First I attached the rope channel mold to the case mold, and trimmed the foam to fit around it:

Off to the left in the picture above are the thick lengths of masking tape that were used to form the taping rebates for the starboard case half. I was able to re-use them for the port case half which saved some time.

Per the suggestion in the plans, I was originally going to use modelling clay to form the radius between the rope channel mold and the main case mold, but it turned out harder than I expected to get a nice smooth radius with the clay:

Even though this will be inside the case and never seen, I decided I could not live with it like that, and instead resorted to a good old-fashioned epoxy putty fillet:

The mold can certainly be re-used for a port half like this, and the rope channel might even pop off with the fillet intact since it is laying against the tape on the main mold.

Thursday evening, after the putty was cured I finished taping up the mold and started getting ready for the lamination\bagging procedure. Here I'm getting ready to cut the bagging film to size, taking into account the height of the mold itself:

I didn't have time to do the lamination Thursday evening, but I did pre-cut the rest of the bagging consumables.

Next, after work today I pre-cut the glass reinforcements and got things ready for the lamination and bagging. Here I'm trial-fitting the first layer of A:

When I did the starboard case half, I laminated the case side glass as it lay vertically against the mold. This is a pain in the rear, because gravity wants to pull the epoxy down onto the melamine board and it gets all over everything. For this case half I did something different: I flipped the side glass up on top of the mold, wet it out in that position, then flipped it back down. This was much easier and worked well (you need to be careful with the glass when flipping it back down, of course, since it's fragile at that point):

Here's how it looked with the first layer of uni and the extra half-section of A in place:

At first I was continually trying to get the glass to lay tightly around the rope channel mold, but it wasn't having any of it - that's why it looks so bubbly on top of the rope channel in the picture above. I gave up on it after awhile, and am leaving it up to the vacuum pressure to whip the glass into shape. However, once I got the foam placed that did help pull some slack out of the glass and push it down into the radius:

The plans don't say anything about it, but I was mildly worried about the gap between the rope channel mold and the foam. It would be almost impossible to pre-cut the foam to make a perfect fit with the wetted-out glass in place. So what I did was mix up a quick batch of putty in the middle of the lamination and filled in the gaps around the channel with it:

You can also see the second layer of uni in the picture above. Next layer was the final large piece of A glass. I laid it in place and wet it out moving from from one side to the other. When I was down to the side glass, I trimmed it to fit (I had left it too wide on purpose, since it was hard to know in advance exactly how wide it needed to be):

Now I was almost done with the laminating part of the job. All that was left was adding the extra rope channel reinforcements:

Finally it was time for peel ply, release film, breather fabric, the bag, and turn on the pump:

The seal turned out pretty good; it gets up to 25lbs and the pump only kicks on about every twenty minutes. My wife helped me fix the leaks, she's getting pretty good at it.

You might note that I didn't put peel-ply down against the mold again. This time it was intentional, I decided that I preferred the nice smooth surface left by the bare mold, since I do plan on painting the interior of my daggerboard case. After seeing how hard that Alexseal polyurethane paint cures, I'm curious to see how well it holds up to being banged on by the daggerboard someday.