Saturday, August 8, 2009

Outboard engine

After more investigation, I finally settled on a Tohatsu 6hp 4-cycle outboard engine: the "MFS6BUL SailPro" model, with a 25" shaft. I bought mine online from Online Outboards; they had a good price to start with; combined with free shipping and no state sales tax, it was the best deal I could find.

My nephew Daniel and I slapped together a storage mount for the engine when it's not on the boat:


I will order some casters to make it easy to move around.

I am also investigating outboard brackets. My goal is to know, well before fairing or painting, exactly how my outboard will be attached so I do not have any problems later on, e.g. with extra reinforcement. Adventure Marine has a simple but expensive fixed bracket, and I am also looking into the various Garelick models.

Regrettably I have some deadlines hanging over my head at work, so today was a short day on the boat, and tomorrow I will be at the office. I did finish taping the settee stiffeners in place. I spent a lot of time studying the settee seat back arrangement (see my post on the google F22 group), and also spent a lot of time dry-fitting the fwd coaming panels before finally settling on an arrangement; I then laminated the backsides of coaming panels and should be ready to start installing them next time. Oh wait, shouldn't I fair, prime, and paint the coaming compartments first? :-)

Sunday, August 2, 2009

Cockpit seats glued on

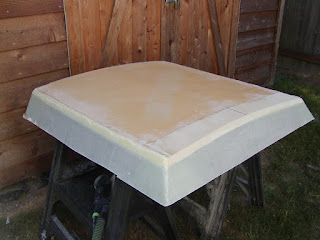
The poptop hatch got an extra layer of A around the top outside edges:

I'm debating whether to put an extra layer of A on the top part. I also have collected all of the raw materials to start assembling the poptop hatch mechanicals (aluminum bars, bolts\nuts, plastic, jib track & slides, etc). I will start on that part of the project as soon as I have finished up most of the smaller jobs going on.

Yesterday I finally finished painting the cockpit compartment interiors; it took me all week to finally get down to 400 grit (yeah right). The weather has been crazy-hot lately, and it was a few degrees above System Three's suggested max temp for paint application. I compensated by thinning the paint with some slightly chilled water. I think it turned out ok:

Definitely a "work boat" finish, but plenty good enough for me. Here's another view in better light:

Here's the strategy I came up with to glue the settee stiffeners at a nice square angle to the settees: The fwd-most clamp does not have a piece of wood, since I didn't think I'd be able to get the screw out once the stiffener was glued in place. Here's a cross-section of one of these stiffeners:

I over-built the stiffeners a bit; two layers of A on each side, then the layer of A around the bottom curved edge, then another layer of A on the top edge (after routing a nice curve onto the front edge):

Eventually after I flip the hull upside down, I'll use A tape along the bottom inside join. So far, the results are quite satisfying: the settees have become nearly rock-solid places to sit. I am still however at a loss as to whether I should enclose the space beneath or not; rather than torture myself further, I decided to just leave the settees as-is for now. (With the limited space in that area, I shudder to think about if\how I'm going to fair the area fwd of the daggerboard case...)

With the compartments painted, I was finally free to glue the seats on:

Not shown in the above picture, but the initial perimeter taping on top of the seats has been done as well. I also dug out the foam from the extra layer on the aft-cabin hatch and filled it with bog (man I hate that job).

Last but not least, I began making blanks for the settee backs.

Tuesday, July 28, 2009

Cabin poptop hatch unmolded

Monday night I laminated an extra layer of A on the inside surface of the hatch (since the plans say A-core-A, and the inside only had B). Today I unmolded the hatch and it doesn't look too bad:

And:

Clearly it will need some trimming (both to level it out, and to shorten the sides) but I'm feeling better that it doesn't look too lopsided or otherwise unsalvageable. I plan to clamp some temporary wood supports to the hatch coamings on the boat to hold the hatch up, then scribe a trim line so the hatch fits reasonably close to the deck.

I also laminated a layer of A around the bottom edge of my settee stiffeners. Wrapping that relatively heavy glass around a 3/8" edge is hard. I routed a curve on both sides, sanded it smooth, and put a thin layer of bog on the edge and sides to help hold the glass in place, but it still kept wanting to lift off from that edge. So I brute-forced the job: continually pulling the edges of the peel-ply down on each side to force the glass back around the curve, until the epoxy finally started to setup hard. A fun twenty minutes... Clamping is another option but a clamp hard enough to hold always seems to leave indentations in the glass; not sure which option is worse. Anyway it's done and both stiffeners are sitting on top of the boat; they should be nearly post-cured after tomorrow's anticipated 100 deg F day.

Sunday, July 26, 2009

Cabin hatch cover mess

My wife and I celebrated 21 years of marriage last week - yay us! Not bad for a couple of kids who were initially only given six months to make it. We didn't do anything fancy (my wife is saving up for something big on number 25), but we did spend all day Saturday driving over to see Grand Coulee Dam; this may not sound very romantic but we both enjoy looking at monumental engineering accomplishments, plus it's a nice long drive so we get to spend time together (Hoover Dam is another one of our favorites). Here I am in front of the dam:

Anyway, that trip plus a busy work week means I haven't got much done on the boat. Today I got a late start (slept in after the trip); first I taped the port settee that I glued in last Tuesday. Then I made a four-sided mold\form for the main cabin hatch cover:

In retrospect, this was a stupid way to do it. The hatch cover meets the front angled mold plate in a a compound curve that is basically impossible to get right with hand-trimming. Don't do it this way, follow Menno's example by laminating the back and sides first, then trim off the front at an angle, then do the front. I spent what seemed like forever trying to get the front of the hatch to fit against the mold, at the same time as levelling the hatch cover within all four sides (and of course you're constantly afraid that you'll trim it too far, which makes the whole process go slower). Finally this is where I decided to leave it (you can't really tell, but I used an epoxy fillet in each corners to form a radius):

You can see that the hatch is not quite level within the form....I will have to trim the hatch edges to make it level. Or maybe I'll leave the rear of the hatch higher than the front, for a "hot rod" look. I got the inside laminated and then quit for the day:

And darn it, I didn't sand out the cockpit compartment primer yet...one thing for sure, that stuff is hard after baking in the tent all week. :(

Sunday, July 19, 2009

Multiple small things going on

Made slow progress this week. I've started on the main hatch cover, by extending the edges of the cutout:

The curvature of the long side extensions did not quite match the rest of the cutout (they don't curve "down" enough), and I will have to long-board them or something to get them to look ok.

I have started making the 4" stiffener extensions for underneath the main cabin settees:

I am still unsure about what to do with the under-settee space (choices are, enclose into storage compartments, versus netting for hanging "loose" storage). Netting seems quickest and easiest for sure - if anyone else has gone this route, would you drop me a line and let me know how well it works?

Three generous coats of primer have been applied inside the cockpit compartments:

I almost started sanding them out today, but decided to wait longer to ensure the primer has cured nice and hard. I am using some left over System Three two-part primer and gray paint (from my 8' rowboat project) for these compartments. The primer did a nice job of covering up many of the smaller dings in the compartments; I think it will look good enough when I'm done.

The port settee has been glued into place, on top of the pre-formed flanges. Back when I did these flanges (a year ago?), I experimented with taping a layer of plastic, then peelply, around the edge of the settee, to use the settee itself as a mold. Unfortunately the tape holding the peelply and plastic keep slipping off, and it turned into a disaster. The resulting flange was far from even or flat. To counteract this, I put a small strip of masking-tape-covered wood under the tape, then screwed into it from above, to try to clamp the tape to the settee:

Here's a picture of the under-cockpit passageway, looking forward from the aft-cabin:

This next picture is a bit dark, sorry. It doesn't show much...

...except for the dark border around the aft-cabin hatch. I formed a 2 1/2" flange around the hatch (on the interior side) and glassed it over: this is because the installation instructions for my hatch say that a 3/4" flange depth is required. One nice side-effect is that the hatch hole has been dramatically stiffened.

Tuesday, July 14, 2009

Cockpit drain holes

Although I was tempted to just glue my cockpit seats on so as to maintain the visible forward progress, I bowed to others' wisdom and decided to paint out the cockpit compartments first. Note: although I am not trying to win the "Best Little Cockpit Compartments in Texas" competition (that honor will go to Ed), I do want things to be smooth enough that blindly sticking a hand in there will not result in any scratches from errant fiberglass spikes. So I first sanded things down, then applied a thin layer of my Alexseal fairing compound:

I have been thinking of trying a home-made fairing compound; the Alexseal stuff cures really hard and is difficult to sand. Isn't that what micro-balloons are for, to make an easy-sanding mixture? Unfortunately I still have a few gallons of Alexseal left to use up, and there's no way I'm wasting that expensive stuff!

I am really kicking myself for not cutting out the drain holes in the cockpit seat fronts before taping them in place. One reason I was thinking that it would better to do this post-taping was because the extra cockpit deck foam would would need to be taken into account. I should have just done the drain holes anyway, but made them 3/8" higher! I think (deep-down) I was simply postponing a simple job so I could get immediate visual gratification by taping the seat fronts in....bad habit for a boat builder. Long story short, I got to spend some time today carving out some drain holes. First I used a Rotozip to get the rough outline cut open, then I used the Fein Multimaster to smooth out the entry from the cockpit deck. Digging the foam edges was a bit tougher, but I found that a paint can opener tool (with the little hooked end that goes under the edge of the paint can lid) worked well for this, in this little space. Here's the port drain hole; you can also see the external drain hole:

It would have looked much cleaner if I had done this before bulkhead install, but I'm confident I have sufficient drain capacity, per the plans.

The foam edges of all four drain holes have dug out and filled with bog.

I was not looking forward to sanding inside these compartments; my Festool RO125 sander is too big to work well in these spaces. I tried using an old Makita orbital palm sander we had in the garage, but that thing was so torquey that it was hard to manage. I treated myself to a new Festool DTS 400 sander after work today:

The new sander really worked well, and the dust collection is (as before) very nice. Merry christmas to me...!

When I was in the aft cabin this past weekend, I got a chance to examine my rudder web taping job. It's not...pretty. I cut some scrap pieces of foam-cored laminate into the shape of the rudder web access holes, and will glue them to a couple layers of A glass to form a flange (same thing Menno did for this bow bulkhead access hole), so that this area can be covered up.