Saturday, October 13, 2007

Port hull half unmolded

Wasn't able to do anything on the boat after work yesterday, so first job today was to finish removing all of the foam screws. When it was all done, I had two large buckets of screws and washers:

I then started working on getting the hull half popped loose. I don't remember exactly how long this took me, but it feels like it was at least an hour, maybe two. I had initially thought that I could run some lines from the peak pole of the tent, and use them to pull it out:


But this didn't work -- just couldn't get enough grip on the line I guess, and it was nylon so it was stretchy. (Probably if I had tied the line to a ratchet it would have worked.) I went back to the trial-and-error way, pushing and pulling here and here, looking for spots that were still stuck. The access hole by the transom makes a great pulling spot, and this was the area that popped loose first:

Next I put my sawhorses in the back yard, layed 2'x4' pieces of wood across them:

This is about the flattest part of my yard (except for where the boat tent is). I did my best to get everything level, using shims under the sawhorse legs; it's not perfect, but I think it will be good enough. Especially since I plan to get the starboard half done as quick as possible.

Now I was ready to completely unmold the hull half, and lay it on the sawhorses. Fortunately all of the neighbors were around today and willing to help. Sean\Bill\Scott\Jim -- thanks a ton guys! I couldn't have done this without you! Unfortunately, no one was available to take pictures of the moving process. Too bad, there would have been some good shots.

We didn't have much of a strategy -- we just pulled the hull half straight up as far as we could get it, then turned it over almost inside the mold, with the deck rotating under. This was all done by hand - no lines or tackle or gantries. Once we had it turned over, we headed out the back of the tent. Here there were some minor difficulties -- scraping the top of the hull half against the tent door flap, then scraping against the oak tree that's right behind my tent -- but in less than five minutes it was all done.

Grant asked me about how stiff the hull was. I thought it was very stiff, and during the move I never saw any serious deflection of the hull shape. I had lots of help on hand and was glad I had them due to the constrained space I had to work in. I'm not sure two people would be enough unless you had lots of space to move around in, and overhead lines to hoist the hull half where possible.

Anyway, here she sits:


(Yeah, I need to throw some more support under the transom area.)

And:

And:

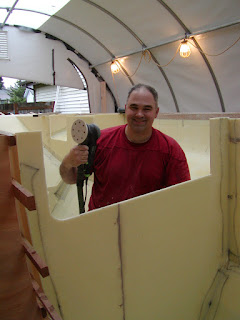
Me underneath the hull half (feeling very excited:) ):

Then I tarped over the hull, using bungie cords to tie it off underneath:

The only thing I'm worried about is that if we get a good wind storm it might get under the boat and blow it off the sawhorses. I could tie it down with some stakes in the ground (or use the stairs and the apple tree :), but we're not really into the windy season yet - so for now I'll just keep an eye on the weather and work as fast as I can on the other hull half.

I then spent some time doing cleanup work in the tent. This is partway through the cleanup, which is why stuff is sitting or hanging on the mold; you can get a feel from this picture how much clearance we had to work with between the top of the mold and the tent door flap (and the oak tree branch):

Last job for the day was taking down the form frames. I thought this job would last into tomorrow, but I was able to surprise myself:

Tomorrow morning I'll start setting up for the starboard hull half.

Thursday, October 11, 2007

Cheekblock plate studs mounted

Last night I put a small amount of fairing compound around the cheekblock hole in the daggerboard case. This was so that I could sand it down today to produce a (reasonably) flat surface for trial-fitting the cheekblock plate and its studs.

The plans say to "tap" the studs into the case side, and since I always take things very literally I actually went and borrowed a tap from my neighbor and experimented with it on some scrap glass. Well, it didn't work so well. But when I drilled a simple, slightly-undersized hole and just screwed the stud into it, that worked pretty good. I don't think it's a real robust tap, but it should be okay so long as you don't screw the studs in and out too often.

So then I marked the holes, drilled them by hand, and mounted the studs:

This was not quite the best way to do it, since trying to drill a perfectly perpendicular hole by eyeball is futile - I ended up having to relieve some of the holes in the plate to get it to fit. Eventually I got it all working, and had everything trial-fitted:

Each stud in the picture above has a nylon washer, flat washer, lock washer, then the acorn nut -- all done per the building manual. The metal parts are all 316 stainless steel. (Can you tell I've been busy shopping at McMaster?)

Here's what it looks like from the inside:

I'm happy with the results - it looks good and feels very strong.

Finally, here are the studs mounted for the last time, bedded in sealant:

I used 3M 5200 Fast Cure. I used only about 1/300th of the tube, but the instructions warn that the entire tube will go hard within days after opening, even with the cap on -- if true, what a gyp! :-)

I think I am now completely ready for joining the two case halves.

I also spent around two hours this afternoon removing screws from the battens to get ready to unmold the port hull - got more than halfway done. Unmolding could happen possibly as soon as Saturday, but by Sunday for sure. I hope my neighbors are all planning to stay home this weekend, and not doing anything too terribly important. :)

Tuesday, October 9, 2007

Beam mounts arrive and cheekblock plate progress

Beam mounts came in the mail today. Woo-hoo! Now I just need a joined and laminated hull to go with them.

They came nicely packed:

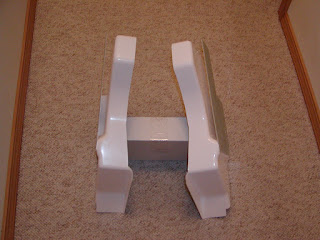
Here are the fwd mounts:

Another view where you can (kinda) see the slot:

Here are the aft mounts:

And another:

The pictures above didn't turn out as good as I hoped -- there's so many interesting angles to these things, that there's really no substitute for touching and handling them in person. They feel nice and solid -- lots and lots of glass in these things!

I was excited last night thinking that I'd be able to start joining the daggerboard case halves today. However I forgot about doing the studs for the cheekblock plate -- can't skip that step :). After drawing out the outline of the plates and marking the location of the holes, I asked my neighbor (thanks Bill!) for some help drilling the holes on his drill press. Here we've punched the hole locations and are about to start drilling:

The small block-shaped outline to the left, is a spacer that will go between the block and the cheekblock plate. Probably by coincidence, the glass in this area of the daggerboard case turned out almost exactly 1/8" thick, so I can use the same aluminum sheet for the spacer.

After we drilled the holes, I brought the blank back to my house. Here I'm jigsawing the parts out of the blank:

Many jigsaw blades gave their lives for this part. After cutting and whittling away at the metal for awhile, then some sanding to clean it up, it looked like this:

It's not quite done - needs more rounding-over on the edges, plus buffing and polishing - but this is good enough that I can use it as a template to mount the screws\studs inside the case. The plans say to "tap" the glass for the studs, but I'm doubtful that the glass will tap that well - I will practice on some scrap glass first.

Monday, October 8, 2007

Daggerboard case anti-fouling

After work tonight, I put two coats of anti-fouling on my daggerboard case halves.

This stuff is 50% solid by volume (75% by weight). I'm always amazed at how a seeming liquid can separate so thoroughly:

The picture above only shows the tip of the iceberg. After a minute or so, I gave up trying to re-mix it in the original can, and dumped it into a plastic bucket -- had to scrape the sides and bottom of the can to get most of the copper sludge out. Once it was all in the bigger bucket, it was much easier to mix it all back together.

So...would your wife let you apply anti-fouling in the living room? Mine does - guess I'm lucky -- though it does have a bit of a stink to it. She also lets me store boat parts here, as you can see:

After the first coat:


Then I cranked up the thermostat on the gas fireplace, to assist in drying this coat. I'll have to stay up late in order to get the second coat on, but it'll be worth it: tomorrow night I should be ready to start joining the two halves into a daggerboard case.

Sunday, October 7, 2007

Almost ready to unmold the port hull half

Slow progress this week -- wasn't able to touch the boat from Wed-Fri unfortunately due to work committments. And yesterday morning -- wonderful $^*#!? timing -- my router went belly-up, necessitating several hours on hold waiting for Verizon tech support to work thru the issue. I feel the days slipping away...

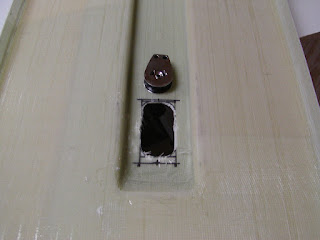
As others have commented, the builder's update that Ian sent out recently was full of great information. The part I cared about the most was the daggerboard case cheekblock details. Nothing was unexpected once I saw the sheet, but now I felt confident enough to proceed with the case construction. I couldn't find a Ronstan 1709 cheekblock as suggested by Ian, but the RF40151HL model looks like it will work. Here it is sitting next to the hole in the case:

Note that Ian specifies that the cheekblock plate be anodised. I've been looking online for a Seattle metal finisher that can do this type of work...there are several, but they all look like heavy-duty industrial outfits. Perhaps I may try to do it myself (there are many DIY kits available, e.g.: http://www.caswellplating.com/).

I have decided to paint the upper interior portion of the daggerboard case with Alexseal 2-part LPU, and the lower interior portion with a copper-based anti-fouling paint (Pettit Copper Bronze). After ten coats of fairing compound...just kidding! :-) No fairing compound at all - yesterday I brushed on three coats of Alexseal primer, and today I sanded it all down smooth (nothing extravagant, just to 320 grit and I didn't try to fill any holes) then setup my sprayer and put on two coats of paint. It's not perfect but should work okay:

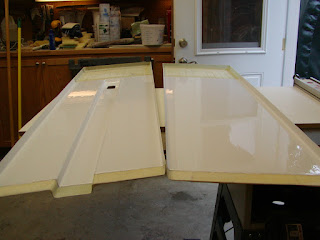
The sterndeck has been taped in place:

And:

I also worked on forming the flange for the cabin settee, using the settee itself as a mold plate. I wanted to try wrapping peel ply around the settee edge (after wrapping it with masking tape)...

...to form a nice ready-to-glue surface. This didn't work so well, because peelply is stretchable - as I was dragging the popsicle stick over it to try to form the fillet, scrape up excess bog, etc, the peelply kept bunching up and moving around. In retrospect, I should have scraped everything off and started over. The resulting flange will probably suffice, but the glass didn't lay flat against the settee in many places, and I had a hard time pulling bunched-up peelply away from the cured bog. The flange looks lumpy-and-bumpy all over. I don't think I'll try this again.

I also spent a few hours today in the hull sanding down all of the tapes:

Peelply would relieve me of having to do this, but as I've discussed with others I find peelply somewhat difficult to use while taping. In tight spots especially, it's hard enough to get the tape to lay nice without disturbing the fillet too much, let alone when you add peelply on top of it. I do have a good case of the itches tonight though. :)

I briefly tried to tape the aft compartment under the aft cabin bunktop, but it turned out to be a nightmare of a job. I couldn't even get fillets formed, working with long sticks, and didn't even get to the point of trying to force glass down into the cracks. Not yet sure what I am going to do about this -- might give up and let it be.

With sanding done, and the settee flange and the sterndeck done, I'm now pretty much ready to get this hull half unmolded. My plan for this is to set up sawhorses in the back yard, lay lumber across them, level them as best I can, and lay the hull on them. I hope this works - my yard isn't all that flat. But I don't really have an alternative plan.

I had forgotten to re-tarp my floats (out of sight, out of mind) and didn't notice until today. They've been getting a good dose of Northwest weather:

I opened a couple of hatches and everything looks dry so far.

Finally, Ian sent me an email to let me know that my beam mounts were sent out air-mail on Friday.

Tuesday, October 2, 2007

Aft bunktop taped (mostly)

From Sunday I had the aft bunktop all ready to go. I taped the outside edge and the fwd enclosed section of the bunktop, and decided to leave it alone at that point. This is because I had a feeling that I would probably dislodge the bunktop out of position if I started poking sticks down into the aft enclosed section; it's a very tiny space.

Here's a view looking forward:

The rear corner of the fwd compartment:

And an outside view:

I think pre-forming the flanges with a short mold plate might have made this an easier job -- I know the taping would have turned out better too. Obviously I won't have a choice but to do that for the matching side in the starboard hull.

As you can probably tell from my complaining above, this was not an easy taping job. Perhaps not as bad as doing the interior float bows, but still hard. Well, there's nothing like a little humiliation to bust your bubble, when you start to think you're getting good at this stuff. :-)

I also dry-fitted the stern deck piece this evening; looks like an easy one to do. Haven't got around to dry-fitting the cabin settee, that's also coming up.

I see Ian commented on the F-boat forum that the first batch of F22 beam mounts should be shipped soon. I ordered mine back in May, but haven't complained about the delay since I didn't need them yet. It will definitely be exciting to get my hands on those parts; I will post some nice pictures when they get here.