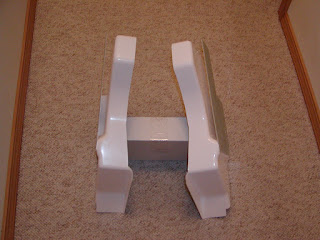
Beam mounts came in the mail today. Woo-hoo! Now I just need a joined and laminated hull to go with them.
They came nicely packed:

Here are the fwd mounts:
 Another view where you can (kinda) see the slot:
 Here are the aft mounts:
 And another:

The pictures above didn't turn out as good as I hoped -- there's so many interesting angles to these things, that there's really no substitute for touching and handling them in person. They feel nice and solid -- lots and lots of glass in these things!
I was excited last night thinking that I'd be able to start joining the daggerboard case halves today. However I forgot about doing the studs for the cheekblock plate -- can't skip that step :). After drawing out the outline of the plates and marking the location of the holes, I asked my neighbor (thanks Bill!) for some help drilling the holes on his drill press. Here we've punched the hole locations and are about to start drilling:
 The small block-shaped outline to the left, is a spacer that will go between the block and the cheekblock plate. Probably by coincidence, the glass in this area of the daggerboard case turned out almost exactly 1/8" thick, so I can use the same aluminum sheet for the spacer.
After we drilled the holes, I brought the blank back to my house. Here I'm jigsawing the parts out of the blank:
 Many jigsaw blades gave their lives for this part. After cutting and whittling away at the metal for awhile, then some sanding to clean it up, it looked like this:
 It's not quite done - needs more rounding-over on the edges, plus buffing and polishing - but this is good enough that I can use it as a template to mount the screws\studs inside the case. The plans say to "tap" the glass for the studs, but I'm doubtful that the glass will tap that well - I will practice on some scrap glass first.
 Here are the fwd mounts:


2 comments:
Jay -
Looking nice. I'll be painting the inside of my daggerboard case soon (between taking breaks fairing the port float).
What did you end up doing for material for the cheek block plate? I've seen anodized aluminium at McMaster Carr, but doesn't it lose the coating after cutting it? Are you planning on getting it anodized after you finish sanding the part?
Thanks Ed. The material is straightforward 6061 aluminum - it was not pre-anodized. I do plan on anodizing it. I am still trying to find a local metal shop that can do it (without charging me big bucks for such a small job), and if that fails I will do it myself. If you search on "aluminum anodizing" you'll find there are several DIY-anodizing-kit suppliers around, eg www.caswellplating.com.
Haven't decided what color to dye it after anodizing though...maybe bright yellow, in honor of Ian's past boats. :-)
Jay
Post a Comment