Monday, September 17, 2007

Starting to trial-fit bulkheads

After yesterday, I had told myself that I wasn't going to post for awhile until I had some real progress to report. That lasted until this afternoon when I started playing around with the bulkheads - it put such a smile on my face that I had to share some pictures.

One half of my bulkhead collection finally gets to see the light of day, after being stored since winter:

There's a bunch more left in the basement, like the settees, forward cabin bunk, etc. The rolled-up uni glass you see on top of the hot box is for the starboard main hull (keel and under-deck strips) - it was just easier to cut it out all at once.

Initial fits not looking too bad:

The main cabin aft bulkhead appears to have a pretty large gap between it and the overhead\deck. But this isn't a precise placement, so I won't get too worried just yet.

Me holding up the aftcabin lower aft bulkhead:

One excited boat-builder:

Okay, enough tooting my own horn -- time to get back to work.

Sunday, September 16, 2007

Upper port hull half laminated

The weather today was just total, absolute crap. Never got above 60 deg F, and it was raining from the moment I got out of bed. Despite these obstacles, I was able to laminate the upper port hull half.

As you're doing this job, many parts of the laminate are hard to reach, and the only way to reach them is to walk on the gunwale (or have some sort of gantry). Obviously I'm walking on the gunwale -- even had to stop using my plywood walkway, since there wasn't room for it and the new laminates as well. Since I was walking back and forth to the garage and it was raining, I started tracking dirt and grass into my hull! Arggh - ya gotta be kidding me I thought - is this a boat or a gardening project?!? Quite aggravating - I had to start carefully checking my shoes before entering the hull. It's like one of those Jeff Foxworthy jokes..."you might be a redneck, if there's grass growing inside your new boat"... :-)

Thankfully the gunwale laminate seemed quite able to bear my weight (so the rest of you should be fine).

I started up at the bow and worked aft. Right after the laminate went past past form frame 5, I added the extra A laminate that the plans call for (since I wouldn't have good access to it later):

Here's the forward half all done, including the strip of uni running horizontal below the center line:

I made sure there was plenty of overlap on all the joins. Right in front of the cockpit though, I cut a piece of glass too short and had to add a patch piece at the upper gunwale:

I did do one thing differently today: I wet-out the foam before laying down the glass on all sections, mainly as a new step in my bubble avoidance strategy. It turned out to have a beneficial effect on the large vertical deck areas: you hold the glass almost in position, fine-tune it, then start lightly pressing it down into the wetted vertical areas. The wet epoxy on the foam then grabs it and usually has enough grip to hold it in place. If I had done this the dry-layup way, the glass would have kept wanting to fall down.

My wife was helping me out today, lending an extra pair of hands for holding the glass while it was getting positioned; it took us about 4 1/2 hours from start to finish.

One final picture, with the halogen lamps turned on; I just thought it made things look cool:

Oops - that extra lighting does reveal some resin-rich areas though.

Well, that's it for today. I go back to work tomorrow, so progress will slow down to a more normal pace for awhile. At least I'm ready to start placing the bulkheads.

Saturday, September 15, 2007

Deck hardware notes

I've spent many hours recently studying deck hardware catalogs trying to figure out what I needed to install, etc. Much of this was simple education on sailboats in general. I now have a long list of items that are under consideration:

  • Mast-base sheaves, to rout halyards from the mast to the deck organizers.
  • Deck organizers, port and starboard, to run halyards (and jib sheets) back to winches.
  • Deck organizer, port, to run daggerboard lines back to cockpit. (if not combined with above item). (This is one advantage of the centerboard that I hadn't thought of: it removes some extra lines from the mess on the cabin top).
  • Stopper cleats in front of the winches for all of the above.
  • Spinnaker\screacher stuff? Still trying to understand what these need.
  • Fairleads to run jib furler lines back to the cockpit.
  • Docking cleats! Even I know that a single bow cleat just won't cut it. At a minimum, the aft cabin will get a cleat on each side. And I may do twin cleats on the bow, instead of one center cleat.
  • Boomless traveller -- I think this will need high density inserts as well, no?

[Edit: I asked Ian about the traveller; he said no inserts are needed for this it will be 100% bonded to the exterior glass.]

  • Mast loop raising attachment points aren't shown on the plans, but I bet they need inserts too.
  • Rotating mast? What does this need?

Another good resource I (re-)found was the F-boat Study Book; it contains several deck layout sheets from his bigger boats, allowing you to compare against the F22 to see what might be added. It's a great deal for $15 IMO.

Anyway, after all of this studying I finally decided that I wasn't going to design a perfect, finalized deck layout in just a day or two. So it would be better to just keep moving on with the hull construction, and add inserts later on as needed. Yesterday afternoon I bogged between the deck and gunwale planks. The marked rectangle in this picture...

...is the outline of the poptop cutout -- notice there's not much room left between the jib track and the poptop for routing lines, so the deck organizers will likely be slightly forward and outboard from the jib tracks.

I was disappointed to see how much bog was needed to attach the bottom edges of the 3/4" deck planks. It would have been much better to miter these at an angle to minimize the gaps.

Thursday, September 13, 2007

Working on deck inserts

After finishing the port hull deck planking today, here's how it looked:

That deck curve turned out nice, if I do say so myself. :-)

Next up were the high density inserts. All I've done so far is cut the holes for the inserts - nothing has been bogged yet. As mentioned in my last post, I'm still wondering what other deck hardware I need to make allowances for. So I spent an inordinate amount of time today staring at the deck layout sheet in the plans, and researching on the internet to see what size various fittings are, what they are used for, etc.

Here is the mast step insert cut-out:

Here you can see the bow deck center cleat cut-out:

Yeah, I admit it's probably over-sized -- I tended to err on the side of caution, in cases where exact insert dimensions were not specified.

I didn't realize before, but now I know that with a center cleat you need chocks or fairleads at the edge of the deck to guide the lines so they don't chafe on the hull. Haven't installed those inserts yet for this hull half -- the ideal time would be before bogging in the bow deck foam, so I will probably wait until the hull half is unmolded.

Here's the winch insert, and the cutout for the jib track insert:

One question that's been nagging me all day: what's a "jib track" used for? Seriously now, don't laugh - I'm honestly wondering about this. I'm guessing that the sheets from the jib attach to it, and are then guided back to the winch(es), but why does it need to be on a track? Does it slide back and forth freely while sailing, or is it a tuning mechanism that you adjust periodically? Would love to hear an answer from someone more knowledgeable than I.

I did all of the deck planking from outside of the mold -- awkwards at times, but doable. Once I started working on the h/d inserts, I decided that I needed to get inside the hull. I'm using a 6" wide strip of marine plywood, cushioned at both ends to avoid tearing at the glass:

So far it seems to hold my weight (about 21 stone) okay, but I'm careful to only step on top of the form frames. I'm glad this worked out -- was worried about this part.

Wednesday, September 12, 2007

Upper port hull planking begun

Before I could start planking today, I had to finish mounting the deck battens. I decided to start with the bow deck section. This part of the plans has an slightly scary sentence "....break or cut battens if needed for correct hull shape...", scary in the sense that it sounds somewhat ill-defined (you don't get much of that in Ian's plans). However, after carefully poring over pictures of other batten'ed molds, and existing hulls (see the f-boat.com site, and pictures of Oliver's hull in Germany), I felt like I had a good idea of what needed to happen.

First I ran the top three battens forward of frame #3, drew a vertical line down the transition point, and then cut them off at a (rough) angle that would meet the battens coming from frames 1 and 2:

The plans specify the transition point as somewhere between 6-8 inches in front of frame 3; I tried to split the difference (7") and ended up at about 7 1/2" inches -- close enough for me.

Then I made some short battens to form the flat deck section. Here I'm scribing a miter line for the topmost batten:

Do this three times, and you end up here:

The forward battens protrude past the rearward ones a bit, but that was fixed quickly by sanding them down flush. Then I squeezed some wood-glue into the miter joints and clamped them for awhile to dry. I saved many pictures of this area, and will reserve these particular battens for the same spot in the starboard mold (in order to make sure the hull halves end up with the same shape).

With that part done, I moved on to the rest of the battens (easy) and then started the upper gunwale foam sections. Here's the first one about to be screwed down from behind:

And eventually:

Finally the part I was waiting for: planking of the deck sections. These are specified to be 3/4" foam, and I have to say that this thick stuff holds a screw like there's no tomorrow -- much better than the 3/8" stuff. All those builders of bigger boats have it easy, I'm telling ya. :-)

In my case, my deck foam is just slightly thicker than 3/4" (21 mm?), since I got a deal on odd-sized offcuts from Noahs.

Here's the first few planks set in, along with the bow deck. I bogged the bow-deck into place already, because it was already a near-flush fit with the gunwale foam and I didn't want to dremel it out later:

I haven't needed the heat gun or the heat box yet, but this foam sure doesn't like to bend much. Good thing the deck has such a gentle curve to it.

Here's my popstickle-stick idea in action (for spacing the planks apart):

And this is where I ended up for the night:

The plans advise installing all of the high density deck inserts at this stage; I will definitely do that for all of the ones that are specified in the plans. I'm a bit concerned about the ones I don't know anything about -- I've really never sailed before (2-3 times doesn't count), and the plans are bit bare in this area. If other F22 builders have already explored down this path, could you please drop me a quick email listing the other deck fittings you've added high density inserts for?

Tuesday, September 11, 2007

Lower port hull half laminated

Started out this morning by pre-cutting my keel uni-directional laminate:

All the other kids - err, I mean F22 builders - seem to always use carbon uni instead of regular glass uni, for such applications. In my case, I bought a large roll of 4" glass uni (see picture above) directly from Ian, and feel duty-bound to use it before I spend more money on carbon. (In truth, I might be waiting awhile because I think there is enough on that roll for three or four F22's. Look for a sale, around this same time next year.)

After the uni was ready to go, I took a break for a few hours while the bog applied yesterday evening cured enough to be sandable (our overnight temperatures aren't so warm anymore). Then I rolled up a bunch of "B" glass on a cardboard tube and tried to lay it out on the foam. Unfortunately I was working by myself, which made things very frustrating:

It was difficult working with such a large piece of glass by myself; it doesn't want to "drag" over the foam, you have to lift up each part and re-position it by hand. Thankfully my wife returned from shopping before I got too frustrated, and helped me out for awhile. Things looked much better after that:

You can still see some wrinkles and burbles here and there, but it was a huge improvement and was definitely workable. However the crimps and wrinkles that I put into the glass caused extra work later on.

I had laminated my floats interiors and exteriors using nothing but a squeegee (and many cups of epoxy). With just a squeegee, you spend a lot of time bent over the mold, moving epoxy around trying to wet everything out. For the main hull, I decided to try using a foam roller for the initial saturation. I don't know if this technique is considered good or bad, but it was definitely a huge productivity win from my perspective! Using the roller, you can move the epoxy around very quickly and easily, and you can press the epoxy into the glass to assist with wet-out. The only downside that I can see, is that the laminate is definitely left in a "resin-rich" state. So I had to use a two step procedure: wet-out with the foam roller, then removal of the excess resin with the squeegee. This seemed to work well and I'm not worried about the quality of the laminate from a glass\resin ratio standpoint.

Here is the first section:

For some reason - neatness? - I decided to use the masking tape trick at the top of the gunwale foam.

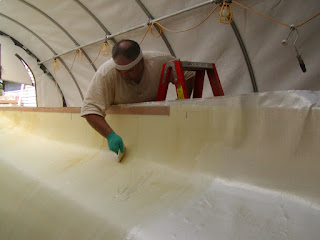
Here's Mr. Boat Builder in action (note, you should wear a tyvek suit while laminating):

Removing excess resin with the squeegee:

After picking up the resin with the squeegee, I'd scrape it off into a cup:

After the initial big piece of glass was all done, I pieced together short sections of glass for the gunwale:

After that, the final task was the glass uni along the keel; I wet-out this piece in the garage, rolled it up, then just un-rolled it into position. This worked really well:

The finished product:

The gunwale section pieces look good too:

I did have a few bubbles that tried to form here and there, but it looks like I was able to catch them before the epoxy cured. The weather was quite warm today, so even with slow hardener the laminate was curing quickly. Overall the laminate looks really good - I am happy. And with the foam roller trick, all this work got done much more quickly and easily than I was expecting.

Tomorrow, or maybe tonight, I'll start mounting the battens for the cabin decks.